Your washing machine supply line has leaked, the visible water is gone, and the grout in the next room is still dark. You may be looking at water under tile, but that phrase doesn’t tell you which layer is wet or how far the moisture traveled.
Your tile can look perfectly normal while the setting material or concrete slab remains damp. Water may reach a wall plate or the edge of adjoining wood flooring, and those hidden materials often drive your budget more than the tile you can see.
If a contractor prices your job by glancing at the floor, that contractor is guessing. The useful questions are where the water started and how much of the surrounding area can be tested without opening the entire floor.
Although full demolition may sound like the safest choice, tearing out sound tile before mapping the moisture can create repair work that the original leak never caused. You need a prompt investigation, but demolition should earn its place in the scope.
Tile Is Only the Visible Layer
Your slab-on-grade tile floor is an assembly, not a single surface. The finish sits over setting mortar, and some installations contain a waterproofing or uncoupling membrane before you reach the concrete.
The exact assembly matters to you because each layer changes how moisture moves and evaporates. The Tile Council of North America technical FAQs explain why membranes and installation methods can’t be treated as interchangeable. Tile bonded directly to concrete presents a different drying problem than tile installed over a low-permeance membrane.
Construction near the wet area can complicate your inspection and budget. A small wet spot in the middle of an open room may be accessible for testing, while the same footprint beneath a kitchen island could require toe-kick access or selective tile removal before anyone can verify what’s wet.
Start With the Water Source
Your first budget category should cover source identification and repair because drying equipment can’t solve an active plumbing leak. Sealing the grout won’t correct moisture moving through the slab, either.
A broken supply line usually creates a different scope than a drain backup because the source affects how exposed materials are cleaned and which porous components can reasonably remain. Professional water-restoration standards from the IICRC address inspection and drying because these decisions require more than a visual check.
Moisture may enter your concrete from the soil side rather than from plumbing inside the house. Building Science Corporation’s explanation of concrete floor moisture shows why sub-slab drainage and vapor-control layers matter. If you see recurring damp grout without a confirmed indoor leak, you may be dealing with a chronic slab condition that requires a different investigation.
When you compare proposals, separate source repair from damage restoration. A plumber may locate and repair a failed line while leaving the drying and finish repair to other trades, so an estimate that says “water cleanup” without defining those boundaries isn’t detailed enough.
Moisture Mapping Defines the Boundary
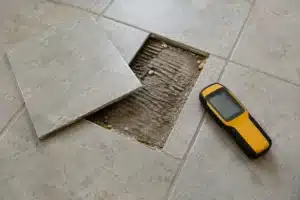
A single reading on top of ceramic or porcelain tile doesn’t define the extent of your tile floor water damage. Surface scanning can reveal patterns, but different materials require appropriate testing methods, and you need the readings interpreted according to the instrument and material.
Your moisture map may need to extend through a doorway and along both sides of an affected wall. If the kitchen tile looks dry but the baseboard in the pantry is swollen, stopping the inspection at the grout line misses the likely migration path. Expanded testing adds labor up front, but it can prevent a much larger repair caused by an assumed boundary.
What Expands the Working Budget
Water Condition and Spread
The condition of the water affects what you can retain and how the exposed area must be cleaned. A clean supply release that was caught promptly isn’t evaluated like an appliance discharge or outdoor floodwater. Once water reaches porous cabinetry or wall materials, your scope may require controlled access beyond the floor.
You need to consider the shape of the spread as carefully as its square footage because water can follow a slab crack or a wall-to-floor joint. A narrow migration path crossing three rooms may require more testing and monitoring than a larger open area contained in one room.
Access and Drying Restrictions
Homeowners are often surprised by how much labor goes into gaining access. Your toilet may need to be removed before the floor around its penetration can be checked, while a fixed vanity can block inspection of the wall edge even when the visible wet grout occupies only a few inches.
Your drying costs rise when dense tile or a membrane restricts evaporation, and the equipment needs usable placement with adequate power. Targeted structural drying should include repeat measurements because the hours an air mover runs don’t prove that a concealed layer is responding.
Occupancy and Coordination
If you’re still using the kitchen, the job creates logistical work that an empty room doesn’t. Your contents may need to be moved, and appliances may require qualified disconnection. Coordination between the plumber and tile installer takes time as well, especially when access for one trade changes what another trade must rebuild.
Targeted Drying Versus Tile Removal
After the source is stopped, targeted drying may be reasonable if the water condition permits material retention and the assembly has a practical drying path. Your tile should remain serviceable, with documented readings showing measurable progress. That’s a decision process, not a promise that every tiled slab can be dried in place.
Removal becomes more likely when the source can’t be reached from another location or moisture is trapped behind a restrictive layer. A damaged installation or inaccessible wet cabinet edge may justify opening the assembly. If your readings plateau while surrounding areas respond, continuing to rent equipment can become its own form of wasted money.
A reasonable scope for your floor can begin with limited access and expand only when the evidence supports it. Opening a toe-kick, for example, may reveal that the wall edge is dryable. If that access fails to expose the wet material, selective tile removal may be your next defensible step.
Premature Demolition Creates New Costs
If tile is removed before the affected boundary is established, uncertainty quickly becomes a construction bill. Once several tiles are broken, your repair may involve surface preparation and grout blending, with dust control and debris handling entering the scope.
Finish matching becomes a budget trap when a small access opening sounds economical but the tile is discontinued and your spare pieces are a different shade. What began as one opening can become replacement across a visually connected area.
Useful clues can disappear when demolition begins in the wrong place. Staining near a penetration or conditions beneath a threshold may help your contractor trace the source, but opening the wrong area first can erase that evidence while leaving the actual wet zone untouched.
The opposite mistake is waiting for the grout to look normal and assuming your job is finished. You need prompt mapping and controlled access, with removal based on contamination or drying performance. Appearance alone doesn’t establish dryness.
When Removal Becomes Necessary
Once tile has lost its bond, the damage may make retention unrealistic even after the underlying material dries. Access can damage a membrane as well, and that membrane must be repaired as part of your tile system.
Your tile floor water damage may require a larger opening when contaminated water reaches porous layers that can’t be cleaned adequately. Removal is justified when concealed moisture can’t be measured or repeated documentation shows no drying progress. At that point, paying for more equipment without improving access is usually overkill.
Safety Testing Can Change the Scope
Your newer tile floor may cover an older resilient floor or adhesive. Those underlying materials don’t automatically contain asbestos, but testing may be required before you disturb them. The EPA recommends avoiding disturbance of suspected asbestos-containing materials until they can be evaluated by properly trained professionals.
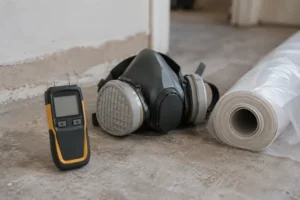
When your project requires tile cutting or mortar grinding, the work can produce respirable crystalline silica. OSHA’s construction guidance for silica affects tool selection and dust-control practices. A demolition proposal that ignores isolation and dust collection may look cheaper because necessary work has been left out.
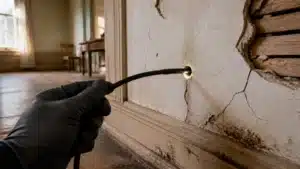
If you notice visible mold or a persistent odor near a wet wall, the finding can change containment and removal decisions. Mold treatment without correcting your moisture source is money spent on the symptom. When growth reaches concealed porous material, access may need to extend beyond the tile edge.
Reconstruction Is a Separate Cost Center
Even when your drying is complete, the room hasn’t been restored. Reconstruction may require resetting fixtures or preparing the slab for new tile, and finish work may be needed at the grout or floor transition. Before you approve mitigation, find out who is responsible for reconstruction and which finish items are excluded because a low initial scope can leave you with an open floor and no defined repair plan.
Compare Scopes Line by Line
When you compare two proposals for the same wet floor, you may find that they cover very different work. One may include leak diagnostics and daily monitoring but stop after drying, while another may include demolition and disposal but exclude plumbing repair. Comparing the totals without examining those boundaries tells you very little.
Your documentation deserves its own line of questioning, so ask what materials will be measured and what condition defines completion. A proposal for water leak cleanup should make clear whether it covers only recoverable water removal or the concealed drying work that follows.
Questions to Ask Before You Hire
Has the source been confirmed and stopped? Ask who is responsible for locating it and who will repair it. If slab moisture remains a possibility, you need to know how the contractor will distinguish that condition from a recent plumbing release.
How was the affected boundary established? Ask which materials were tested and whether adjoining rooms were included. You should know if walls and cabinet edges were evaluated before anyone recommends removing your floor.
What would make the scope expand? Ask what drying response your contractor expects and which readings would trigger selective demolition. Find out whether membranes or unavailable matching tile could enlarge your repair area.
What happens after drying? Ask whether the proposal includes disposal and reconstruction or ends with mitigation. Before you approve demolition, find out if safety testing is needed and how dust will be controlled. Those answers reveal far more about your likely budget than a price attached to the visible tile alone.
References
- Tile Council of North America technical FAQs (tcnatile.com)
- IICRC Standards (iicrc.org)
- BSI-003: Concrete Floor Problems (buildingscience.com)
- Protect Your Family from Exposures to Asbestos (epa.gov)
- Silica, Crystalline – Construction (osha.gov)