Hidden mold in a structural insulated panel wall is a lousy place for guesswork. Tearing down every finished surface is expensive and often unnecessary, but waving an infrared camera at the wall and declaring the case solved isn’t much better. A reliable investigation combines SIP wall moisture mapping, infrared thermography, comparative moisture readings, building plans, and carefully placed borescope inspection ports. Each tool answers a different question, and none can inspect the entire assembly by itself.
Why SIP Moisture Is Different
A structural insulated panel typically has a rigid foam core bonded between structural facings, most often oriented strand board. Those bonded facings help carry loads. This isn’t a conventional framed wall with an open cavity where a camera can wander between studs.
That construction changes how water behaves and how an investigator can find it. Moisture may follow a panel joint, spline, fastener, electrical chase, window opening, or damaged facing. It can remain concentrated near one edge instead of spreading evenly through the entire panel. The interior surface may even feel dry while the exterior-facing OSB remains damp around failed flashing.
The foam core usually isn’t a strong food source for mold, but that doesn’t make a wet SIP mold-proof. OSB, paper-faced finishes, dust, adhesive residue, wood splines, and nearby framing can support fungal growth. Long-term wetting can also cause OSB swelling, decay, delamination, or loss of the bond between the facing and foam.
Surface mold and structural failure aren’t the same thing. A stained facing hasn’t automatically lost its strength. On the other hand, an OSB facing that’s soft, swollen, decayed, or separating from the core needs more than a bottle of cleaner. It may require review by the panel manufacturer or a structural engineer.
Start With the Water Story
Professionals shouldn’t begin by drilling holes wherever a wall looks suspicious. The first step is figuring out which moisture sources are plausible. We ask when the odor, stain, or damaged finish first appeared and whether it changes after rain, during cold weather, or when indoor humidity rises. Past floods, frozen pipes, firefighting water, window repairs, roof work, and plumbing failures all belong in that history.
Original SIP drawings and shop drawings are especially useful. They can show panel seams, splines, electrical chases, openings, and connection details. The panel manufacturer’s name matters too, since access and repair requirements aren’t identical across every SIP product.
Exterior water commonly enters around window heads and sills, roof-to-wall intersections, deck attachments, wall caps, utility entries, exterior lights, mechanical penetrations, and failed sealant joints. Missing flashing or a poorly integrated weather-resistive barrier can send water behind the cladding without creating an obvious indoor drip.
Interior sources include plumbing leaks, showers, laundry equipment, condensate drains, and excessive indoor humidity. Air leakage deserves equal suspicion. Warm, humid air can move through an unsealed panel joint or electrical chase, reach a cold surface, and condense. That means a wet facing isn’t automatic proof of a rain leak.
As an example, consider a second-floor stain below a window that darkens after wind-driven rain. That pattern supports an exterior leak theory. If the same area becomes damp only during cold weather while indoor humidity stays high, condensation at a poorly sealed joint becomes more plausible. Similar stain, different cause, different repair.
How SIP Wall Moisture Mapping Works
SIP wall moisture mapping is a repeatable process, not three random meter readings written on masking tape. An investigator creates a wall elevation or photo grid and records panel joints, openings, stains, thermal patterns, meter readings, access locations, and known-dry reference points. Indoor temperature, relative humidity, recent weather, and the date and time of the inspection also matter.
The map helps show whether readings form a logical pattern. A narrow wet trail below a window corner suggests something different from widespread elevation along a cold panel seam. It also gives the remediation crew a defensible boundary for targeted access instead of asking them to remove drywall until somebody gets tired.
| Investigation Tool | What It Helps Show | What It Doesn’t Prove |
|---|---|---|
| Visual survey | Staining, swelling, corrosion, cracked joints, failed sealants, and likely water paths | The full extent of concealed damage |
| Infrared camera | Surface-temperature patterns that may identify suspect areas | The presence of water or mold |
| Nonpenetrating meter | Comparative moisture patterns across finished surfaces | Exact wood moisture content unless properly calibrated for the material |
| Pin-type meter | Localized readings at a selected point or depth | Conditions beyond the probe’s physical reach |
| Borescope | Visible conditions at a selected access point | Conditions through solid foam or across the entire panel |
What Infrared Can and Cannot Show
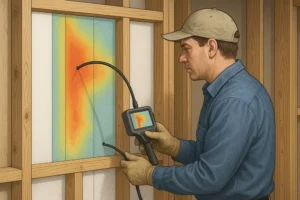
An infrared camera records surface temperatures. It doesn’t see mold, and it doesn’t see water through a wall. A damp area may appear cooler because of evaporation or different thermal conductivity. Wetting may also reduce insulation performance or change how quickly an area heats and cools.
Unfortunately, plenty of dry conditions create similar patterns. Structural members, missing insulation, HVAC airflow, electrical components, reflective finishes, thermal bridging, sunlight, and wind can all produce thermal anomalies. A colorful image is easy to sell as scientific proof, but the colors are only a visual scale of temperature differences.
Good thermography includes context. We document indoor and outdoor temperature and relative humidity, recent rainfall, wind, and solar exposure. When practical, we scan from both sides and compare suspect locations with known-dry areas built from similar materials. Repeating the scan after conditions change can help separate moisture from a construction feature.
An infrared anomaly tells us where to investigate next. It doesn’t authorize mold remediation by itself.
Confirming Patterns With Moisture Meters
A nonpenetrating capacitance or radio-frequency meter can quickly survey a finished wall. It works well for comparison, especially when the same meter and mode are used across similar materials. The investigator can outline areas that respond differently from dry reference locations.
Those readings can be distorted by metal fasteners, electrical wiring, pipes, material density, surface coatings, foil-faced components, and differences in wall thickness. Unless the meter is calibrated for the exact material, the readings should usually be treated as relative values rather than precise wood moisture percentages.
Pin-type meters provide more localized information. Insulated probes can sometimes measure at a selected depth, helping distinguish surface moisture from deeper wetting. They still have limits. A probe can’t report conditions it doesn’t reach, and it can contact wiring or damage a structural facing if used without planning.
There’s no universal meter number that proves a SIP is moldy, dry, or structurally safe. Meter type, wood product, climate, finish material, environmental conditions, and calibration all affect interpretation. Dry reference readings from comparable sections of the same wall are far more useful than a mystery threshold pulled from the internet.
Placing Borescope Inspection Ports
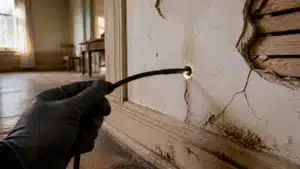
Borescope inspection ports are used after the moisture map identifies the best places for direct observation. Strong candidates have overlapping evidence, such as a thermal anomaly, elevated comparative readings, staining, a concentrated odor, and a plausible leak path near a panel joint or window opening.
The least disruptive access route should come first. We may begin behind removable trim, an outlet cover, an existing access panel, or a small opening through drywall. Exposed panel edges, known wiring chases, and panel joints may offer useful access. Exterior cladding can sometimes be removed locally when the suspected damage is near the outer facing.
Electrical circuits should be identified and de-energized when drilling near wiring. Plumbing and other concealed services must also be located. A small camera port isn’t small compensation for a punctured water line.
Why Random Drilling Is a Bad Bet
Drilling through drywall is not the same as drilling through a SIP skin. The OSB or plywood facing contributes to structural performance and may also be part of the wall’s air, fire, and moisture-control system. Unplanned holes can damage wiring, reduce air tightness, create a new moisture route, or compromise a facing that was otherwise serviceable.
Any opening through the structural skin should follow the SIP manufacturer’s instructions or an engineer-approved procedure. Hole diameter, location, spacing, sealing, and repair can all matter. Turning the wall into Swiss cheese because the first camera angle wasn’t exciting is not limited destructive testing. It’s just uncontrolled damage.
What the Camera Can Actually See
A borescope can document visible fungal growth, staining, condensation, corrosion, swollen wood, deteriorated panel edges, failed sealants, debris in a chase, or conditions around a penetration. An articulating head, adjustable lighting, photo capture, and clear location labels make the findings more useful.
The limitation is straightforward: a borescope can’t see through solid foam. A port through interior drywall may show only the room-side structural facing. It won’t magically inspect the exterior-facing OSB on the opposite side of the foam core.
Deeper inspection may require access through a manufactured chase, panel seam, spline, or exposed edge. In some cases, a controlled amount of foam must be removed under an approved procedure. If evidence points to the exterior facing, selectively removing cladding may be more informative and less damaging than boring through the full panel from indoors.
Every image should be tied to a specific port and wall location. A blurry photograph of something brown inside a wall isn’t a diagnosis. Investigators need orientation, scale, nearby construction details, and confirmation that the camera is actually viewing the suspected material.
When a Port Becomes an Opening
A small port can confirm that a problem exists, but it often can’t define the full repair boundary. If the camera shows fungal growth, heavy staining, swollen OSB, or deterioration at a joint, a larger targeted opening may be necessary.
The opening allows direct evaluation of how far damage extends and whether one or both facings are affected. It can reveal wet splines, failed adhesive bonds, delamination, decay, and damage at panel connections. It also allows direct moisture readings and a closer assessment of whether the affected material can be cleaned and dried.
This is why “without full demolition” should mean minimized demolition, not zero demolition. The goal is to remove only what the evidence supports while preserving dry, serviceable portions of the assembly. Sometimes the least invasive investigation reveals that substantial removal is justified. That’s still a successful investigation because it replaces speculation with evidence.
Suppose mapping finds elevated readings in a narrow area beneath one corner of a window. A borescope port shows staining at the panel edge, and exterior access confirms failed sill flashing. The crew may need to open only the affected corner and a section of exterior cladding. Without mapping, someone might remove finish across the entire room and still miss the exterior defect.
Targeted SIP Mold Remediation
Opening a mold-contaminated wall can release spores and settled dust. Containment should match the size and conditions of the project. Controls may include isolation barriers, restricted access, negative air pressure, HEPA-filtered air machines, personal protective equipment, protected debris routes, and bagging or wrapping removed materials.
The work area should be arranged so pressure changes don’t push contaminants into clean rooms. Worker protection and containment practices should follow the project conditions and recognized guidance such as the EPA’s mold remediation guidance and the ANSI/IICRC S520 standard.
Fix the Source Before Cleaning
Drying a wall without correcting its moisture source is a temporary performance. Repairs may involve rebuilding window flashing, correcting roof drainage, repairing plumbing, restoring the weather-resistive barrier, sealing panel joints, addressing indoor humidity, or fixing an HVAC condensate problem.
Condensation problems require more than surface caulk. Investigators may need to address air leakage, insulation continuity, indoor moisture generation, and cold surfaces together. The EPA’s moisture-control guidance explains why liquid water, water vapor, airflow, drainage, and drying all affect building performance.
Decide What Can Stay
Material decisions depend on porosity, duration of wetting, visible growth, odor, swelling, delamination, decay, structural function, and whether every affected surface can be reached. Mold-contaminated drywall, paper facings, and badly deteriorated composite wood often require removal.
Sound wood may sometimes be physically cleaned and dried. A SIP facing needs extra scrutiny because it’s both structural and bonded to the foam core. If the facing is soft, badly swollen, decayed, delaminated, or detached from the core, a structural engineer or panel manufacturer should determine whether a repair detail is acceptable.
Spraying bleach through a borescope port isn’t remediation. The spray won’t reliably reach every contaminated surface, it can add moisture, it leaves damaged material in place, and it does nothing about failed flashing or a leaking pipe. Remediation depends on source correction, access, physical removal or cleaning, HEPA dust control, and verified drying. Chemicals can’t restore rotten OSB or a failed adhesive bond.
Rebuild Every Layer
A completed repair must restore more than the appearance of the wall. Depending on the opening, reconstruction may need to restore structural capacity, the facing-to-core bond, insulation continuity, the air barrier, water-management layers, vapor control, fire protection, interior finish, and exterior drainage.
Borescope ports also require suitable repairs. A hole through drywall may need a finish patch and restoration of any fire or air-control layer behind it. An approved opening through a structural facing may require a manufacturer- or engineer-specified patch, sealing detail, or structural reinforcement. Filling every hole with canned foam doesn’t automatically replace the function of an OSB skin.
Verifying Dryness Before Closure
Verification should happen before finishes hide the repair. The moisture source should be corrected, exposed surfaces should be free of remaining visible mold and debris, and there shouldn’t be an unexplained musty odor. Moisture readings should be consistent with known-dry reference areas of similar construction.
We document meter type, mode, sensing depth, temperature, relative humidity, and reading locations. Before-and-after photographs help show what was removed, what remained, how the source was repaired, and how the assembly was rebuilt. Structural repairs should follow the approved detail rather than a field improvisation that merely fits behind the drywall.
A single surface reading isn’t enough when deeper materials were wet. The surface can dry before the panel edge, spline, or exterior facing. Verification must address the materials and depths that the investigation identified as affected.
When Mold Testing Makes Sense
Mold sampling isn’t automatically required. According to the EPA’s mold testing guidance, visible mold often doesn’t need to be sampled before cleanup. If a material is visibly moldy and the moisture source is known, identifying a species usually won’t change the need to correct the water problem and remediate the material.
Sampling can help when suspected contamination isn’t visible, an odor source remains unclear, results will change the remediation scope, or legal, insurance, health, or project specifications require it. Tape lifts, swabs, bulk samples, air samples, and cavity air samples each answer limited questions.
A negative air sample doesn’t prove that a SIP wall is clean. Hidden growth may release few spores during the short sampling period, and results vary with airflow, activity, weather, and collection methods. A cavity sample represents its sampled location, not every joint and facing in the building. Air testing also doesn’t map the physical boundary of water-damaged OSB.
Common SIP Moisture Questions
Can an Infrared Camera See Mold in a SIP Wall?
No. It detects surface-temperature differences. Those differences may support further investigation, but moisture-meter readings or direct observation must confirm what caused the anomaly.
Can a Borescope See Through SIP Foam?
No. The foam core is solid. The camera needs an accessible chase, joint, panel edge, controlled foam removal, or separate access from the other side to view deeper portions of the assembly.
Is It Safe to Drill Through a SIP Facing?
Not without planning. The facing contributes to structural performance and may support air, fire, and moisture-control functions. Locate wiring and other services first, then follow the panel manufacturer’s instructions or an engineer-approved method.
Does Wet OSB Always Require Replacement?
No. The decision depends on wetting duration, swelling, decay, bond condition, structural function, mold extent, and whether the material can be accessed, cleaned, and dried. Softness, delamination, decay, or facing-to-core separation calls for structural review.
Can Mold Be Removed Without Opening the Wall?
Sometimes an investigation can show that the suspected area is dry or that the odor comes from another source. Confirmed mold on concealed porous material usually requires enough access to clean or remove it properly. A camera port can reduce unnecessary demolition, but it can’t scrub an inaccessible facing.
What Causes Condensation Inside SIP Walls?
Warm, moisture-laden air can leak through panel joints, electrical chases, penetrations, or poorly sealed connections and contact a surface below its dew point. Indoor humidity, outdoor temperature, air-barrier defects, and insulation continuity all affect that risk.
Why Do Dry Reference Readings Matter?
They provide a building-specific comparison. The same meter may respond differently to drywall, OSB, coatings, fasteners, and wall thickness. Comparing suspect areas with similar known-dry areas is usually more defensible than relying on one universal number.
When to Call a Professional
Professional assessment is warranted when moisture returns after repairs, affects multiple panel seams, reaches structural connections, or accompanies soft and swollen facings. It’s also sensible when the leak path is unclear, occupants have specific health concerns, contamination will be disturbed, or electrical chases complicate safe access.
A restoration contractor can coordinate moisture mapping, controlled access, containment, selective removal, drying, and documentation. A structural engineer or SIP manufacturer should become involved when facings have lost thickness or stiffness, bonds have failed, panels have delaminated, or repairs could affect load paths and connections.
If you suspect hidden moisture in a SIP assembly, All Nation Restoration can help evaluate the wall with an evidence-based approach. The objective isn’t to promise a magically hole-free inspection. It’s to find the source, document the affected area, place the fewest useful borescope inspection ports, and open only what the evidence says must be opened.