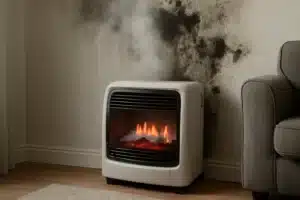
If water just rolled through your living room and your drywall looks like a paper towel that lost a bar fight, you’re probably thinking: how high do I make the flood cut? Cut too low and you trap wet insulation and microbial party favors behind your walls. Cut too high and you’re paying for extra drywall you didn’t need to remove. This is your practical, no-BS guide to setting flood cut height using real-world cues like drywall wicking, moisture readings, and the type of water you’re dealing with. We’ll help you pick the right number so your home dries faster with minimal demo and no hidden mold surprises later.
Why Flood Cuts Matter
A flood cut is a strategic horizontal cut in wet drywall to remove saturated material and open the wall cavity so it can actually dry. That single decision impacts everything that happens next. Set the height too low and moisture keeps wicking up into the paper facing, insulation keeps dripping, and mold sets up shop just out of sight. Set it too high and you over-demolish, you rack up repair costs, and you’re cursing your past self when you realize you didn’t need to go that big. Done right, a smart flood cut stops hidden mold growth, protects wiring and insulation from slow-rot misery, and speeds up drying so you can rebuild sooner.
What Drywall Wicking Does
Drywall is a gypsum core wrapped in paper. Translation: it’s a sponge in a nice shirt. When water hits the bottom of a wall, it doesn’t just stop at the visible water line. Water climbs. Capillary action pulls moisture up the gypsum core and the paper facing, sometimes a foot or two above where you can see staining. That climb is drywall wicking, and it’s why your cut height should be set by actual moisture, not just what looks stained. Signs you’ll notice include soft or crumbly drywall near the base, musty odor, baseboards that pop off a little too easily, or paint that starts to bubble higher than expected. You may not smell anything at first, but once the air dries and the wall stays damp behind the paint, that smell shows up like a late guest who didn’t bring snacks.
How Pros Set Cut Height
There are two ways to decide flood cut height: eyeballing and evidence. We like evidence. Pros use moisture meters and thermal cameras to map the moisture gradient up the wall. Industry guidance commonly lands in these ranges:
For typical clean-water events with a modest visible water line, flood cuts are often set 12 to 18 inches above what you can see. That’s enough to account for wicking and allow airflow for drying. If you had deeper flooding, the water sat for more than a day or two, or the insulation is obviously wet, cuts jump higher, often 24 to 48 inches. If moisture readings show dampness far above the stain, pros cut above the highest reading, not a fixed number. Drywall does not care about your budget when it wicks, so follow the readings.
How High Should You Cut?
Use this decision framework to get in the right neighborhood. You still need meter readings if you can get them, but this table keeps you from guessing blind:
| Factor | Low Cut ~12 in | Higher Cut 18–24 in | Very High 30–48 in+ |
|---|---|---|---|
| Visible water line height | Brief splash, wet baseboards only | Several inches up the wall | Water rose high or stood for hours |
| Wicking evidence | Minimal staining, firm drywall above base | Soft drywall higher up, meter shows damp | Extensive damp far above stain, visible mold |
| Time wet | Under 12 hours | 24–48 hours | Days or repeated events |
| Water type | Clean water | Gray water | Black water or floodwater with contaminants |
| Insulation | Dry behind baseboards | Partially damp | Soaked or slumping in cavity |
If you only remember one rule, make it this: set the flood cut above the actual moisture. If your meter shows moisture 22 inches up the wall, your cut is higher than 22 inches. If you lack a meter, err on the high side of the ranges that fit your situation. Mold starts within 24 to 48 hours on porous materials, and it loves the paper on drywall like it’s an all-you-can-eat buffet.
Cut Too Low vs Too High
Cutting too low is the sneaky budget-killer. You think you saved on demo, but you left wet paper and wet insulation above the cut. Two weeks later you get a musty smell, your paint bubbles, or your baseboards warp. If you open it back up, you’ll find the kind of fuzzy science experiment nobody wants in a living room. You’ll pay for demolition twice and delay rebuilds while everything gets treated, dried, and inspected again.
Cutting too high is the loud budget-killer. You yank out more drywall than necessary, double your finish work, and spend extra on texture and paint. Sometimes a high cut is justified. If water sat for days, if your insulation is soaked up to your shoulders, or if the water was contaminated, go big so you can clean and dry it right. But if you’re in a clean-water, quick-response situation, a clean 12 to 18 inch cut is often plenty as long as your meter agrees.
Field-Tested Cutting Tips
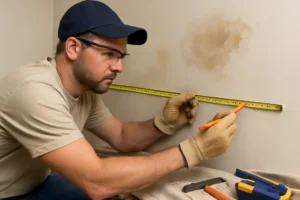
Use a meter to find the real moisture line. Pin or pinless meters both work if you know how to read them. Take readings in a grid pattern, then mark the highest wet reading with a pencil. That’s your minimum cut height. Snap a chalk line or use a laser level to get a straight cut. Your future self will thank you when it’s time to hang new rock. Shut off power to affected circuits and use a stud finder with AC detection so you’re not discovering wiring the hard way. If your home was built before 1978, get lead paint and asbestos testing where applicable before cutting. Old drywall joint compound and textures can contain asbestos. Wear PPE. Drywall dust is not a snack.
Score the paper face first, then use a drywall saw set shallow so you don’t plow into plumbing or wiring. Pop the baseboards first and save them if they’re not swollen. Remove any wet insulation you expose. If it’s fiberglass batt and it’s wet, it usually needs to come out. If it’s cellulose, it clumps and holds moisture forever, so it goes. Closed-cell spray foam sometimes survives if only the drywall got wet, but verify dryness with meters and a boroscope. After demo, open the wall cavities fully to airflow and run dehumidification. Air movers without dehumidifiers are just fancy fans that move moisture around the house.
Can You Skip Flood Cuts?
Sometimes, yes. If you had a small clean-water leak that was caught quickly, you might dry in place. That usually means removing baseboards, popping a few low vent holes, injecting dry air into the cavity, and running proper dehumidification while monitoring with meters. The prerequisites are strict: clean water only, under 12 to 24 hours of exposure, no insulation in the affected cavities or insulation that tests dry, and meter readings that drop to normal during monitored drying. If any of those fail, put the saw to work and make a flood cut. Skipping when you shouldn’t is like painting over rust. It looks fine until it doesn’t.
Insulation And Wiring Checks
Insulation tells on your walls. Fiberglass batts look fine from the front but hold a surprising amount of water at the bottom. If they’re heavy, matted, or cold to the touch, they’re wet. If it’s wet, remove it. You can sometimes dry the framing with no insulation in place and reinstall new batts later. With cellulose, even a little water means it’s coming out. For spray foam, you need targeted readings and a pro’s opinion, because foam can hide moisture along studs and plates. As for wiring, water exposure alone does not mean you replace every wire, but you absolutely need to inspect connections, outlets, and low-voltage lines within the wet zone. Shut off affected circuits, dry the cavities, and replace any outlets or devices that were submerged. Document it for your electrician and your insurer.
Mold Already Started?
If you see visible mold growth or you’re past that 48-hour mark with wet drywall, plan on higher cuts. Treat the exposed framing with EPA-registered antimicrobial products after physical removal of growth, then dry to target moisture content before closing anything up. Drywall with mold growth goes in the trash, not under new paint. And crank up containment and air filtration. A HEPA air scrubber running during demo and cleaning reduces cross-contamination. Mold spores are tiny, ambitious, and do not care how fast you want your home back.
Real-World Cut Heights We Chose
Example 1: The Dishwasher Oops. A supply line burst, flooded a kitchen for around 45 minutes, and ran across tile into the adjoining dining room carpet. Visible water line on the dining room drywall was around 2 inches. Meter readings showed elevated moisture up to 11 inches in two spots, 9 inches elsewhere. We snapped a line at 16 inches, cut, removed a narrow band of damp insulation, dried 3 days with dehumidification, and rebuilt. Cutting at 12 inches would have left a thin wet strip at the bottom of the paper above the cut. That thin strip is where mold loves to lounge.
Example 2: The Laundry Room Flood. A standpipe overflow ran overnight while the owners were out, soaking the laundry room and two adjoining walls. Baseboards swelled. Visible line 4 to 6 inches, but the meter climbed to 21 inches in one corner with an exterior wall. Insulation slumped at the bottom of the cavity. We cut at 24 inches, removed wet batts, dried 4 days with heat and dehumidification, then treated the plates and studs. Cutting lower would have left insulation dripping behind the drywall. Cutting higher than 24 inches added cost with no drying benefit.
Example 3: Street Floodwater. Category 3 intrusions change the rules. Floodwater with contaminants hit a basement level with 8 inches of standing water for several hours. Everything it touched got the blacklist. We cut at 48 inches because meters showed elevated moisture up to 34 inches and we needed to remove soaked insulation and contaminated drywall and clean the wall cavity thoroughly. Sometimes high cuts are the only way to get a sanitary, rebuild-ready space.
Drying After The Cut
Once the wet stuff is out, the real work begins. Drying is not just pointing a fan and hoping. You want controlled airflow across exposed studs and plates, low-grain dehumidification to actually remove moisture from the air, and temperature control to keep evaporation steady. Track daily moisture readings on studs, sill plates, and any sheathing. When your numbers hit normal for your region and materials, you’re ready to close up. If numbers stall, recheck for hidden pockets behind cabinets, inside chases, and at corners where insulation bunches up. If you leave cavities closed and wet, you’re starting a mold subscription service you definitely did not sign up for.
Rebuilding Smart
When it’s time to rebuild, consider moisture-resistant options for the lower 2 feet in areas that are repeat offenders. Greenboard is moisture-resistant, not waterproof, but it’s still better than standard drywall in splash zones. Cement board is king in true wet areas like shower surrounds. If you live in a flood-prone area, look into flood-resilient panels and removable lower sections that make future repairs faster. Caulk baseboards at the top after paint to keep minor spills from sneaking behind them, but leave the bottom gap for airflow and to avoid trapping moisture.
What If You’re On A Budget?
If cash is tight and you’re trying to minimize cuts, use data, not hope. Borrow or rent a moisture meter. If you can prove readings are dry at 12 inches, set your cut at 14 to 16 inches and call it good. If you lack a meter, use the conservative side of the ranges for your situation, especially once you pass the 24-hour mark. Skimping an extra 4 inches today can cost you a mold remediation later. That trade is never worth it.
How We Set Cut Height
Here’s our routine. We map moisture with meters and thermal imaging, mark the highest reading, and add a safety buffer. We consider how long the materials were wet, what kind of water we’re dealing with, and whether there’s insulation in the cavity. If the insulation is wet, we pick a height that clears it in one go so we’re not making stair-step cuts. We protect wiring and plumbing, we cut straight, we remove anything that can hold moisture, and we dry to target numbers before we talk rebuild. You’ll see our reasoning in writing with photos and meter logs, because documentation is the friend you need when adjusters have questions.
Common Mistakes To Avoid
Do not set cut height by stain line alone. Wicking outruns stains. Do not blast air without dehumidification. You’ll just push moisture into cooler rooms and into your wall cavities. Do not leave wet insulation in the wall because it looks only slightly damp. It holds water like a sponge and slows drying to a crawl. Do not rush to close up walls before numbers hit normal. Getting patchwork done fast feels good until the smell comes back. And do not ignore safety. Cut power to wet areas, wear PPE, and test for lead and asbestos in older homes before you start slicing.
FAQ
What’s A Safe Flood Cut Height If I Don’t Have A Meter?
For a small clean-water event caught fast, a 12 to 16 inch cut is a decent conservative target. If water sat for a day or more, go 18 to 24 inches. If you had floodwater or you see visible mold, jump to 24 to 48 inches and plan on full cavity cleaning. When in doubt, go a little higher rather than risk trapping moisture.
Can I Dry Without Cutting If The Bottom Feels Firm?
Maybe. If the water was clean, exposure was under 24 hours, there’s no insulation in that cavity or it tests dry, and meter readings drop to normal during drying, you can sometimes dry in place with baseboard removal and injection drying. If any of those conditions fail, make the cut.
How Do I Know If The Insulation Is Wet?
Pull a small section at the bottom during your first test cut. If it’s heavy, cold, matted, or your meter pegs near it, it’s wet. Fiberglass and cellulose that are wet should be removed. Closed-cell foam can be evaluated with readings and a boroscope, but assume more inspection is needed because foam can trap moisture along framing.
Will Cutting Higher Actually Dry Faster?
Yes, if you’re removing wet material and opening more surface area for airflow. The point is not to cut high for sport. It’s to cut above the real moisture line and remove anything that keeps the cavity wet. Done right, a slightly higher cut that clears all moisture beats a low cut that leaves a wet strip that stalls drying.
What About Pipes, Wires, Or Surprises In The Wall?
Scan the wall with a stud finder that detects AC and metal. Cut shallow. Expect horizontal wires near outlet height and vertical runs from the attic or crawlspace. Shut off circuits to the wet rooms. If your home is older, get lead and asbestos testing where needed before demo.
When Can I Reinstall Drywall?
When studs, plates, and sheathing read dry for your region and material type on a reliable meter for two days in a row. If you’re not sure what target numbers should be, ask a pro. Rebuild without hitting those numbers and you risk locking in moisture.
Call Us Before You Cut
If you want a flood cut height you can defend to your wallet, your adjuster, and future you, get professional moisture mapping. We bring meters, thermal imaging, and the experience to know when 14 inches is enough and when 36 inches saves you weeks of headaches. We justify what we remove and what we save, then we dry it right and document every step. Need help today? We’re ready to stop the wicking, set the right flood cut height, and get your walls drying for real.