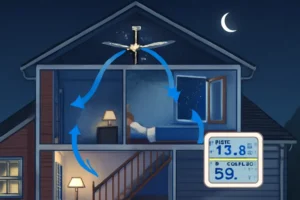
You know that whiff of basement-funk that greets you when you come home? Or those hardwood boards that look like they spent summer at the beach and came back with a permanent curl? Nine times out of ten, your crawl space is the drama queen behind it. Vented, damp, and ignored, it sneaks moisture into your house until mold throws a block party and your floors start to cup. The fix that almost nobody does soon enough is crawl space encapsulation with real dehumidification. Do it right and you stop the stink, lock down humidity, and give your wood and lungs a break.
Why Crawl Spaces Cause Big Problems
Crawl spaces sit on raw soil. Soil breathes moisture. Add a few foundation cracks, open vents, and the usual pipe drips, and you have a perfect humidity factory. Mold starts waking up when relative humidity sits above about 60 percent. In a vented crawl space, outdoor air flows in and slams into cooler surfaces like joists and sill plates. That air cools, the moisture condenses, and the wood snacks begin. Meanwhile, all that damp air works its way up into your home. If you have hardwoods above your crawl, the wood underneath acts like a sponge and sucks moisture from below, which can lead to floor cupping. It is like your floor is breathing through a wet towel.
Then there is energy waste. Conditioned air you paid to cool or heat leaks out through that vented underbelly. Encapsulating and conditioning the crawl space turns it into part of the home’s controlled environment, which typically reduces the load on your HVAC. Several studies and field reports point to double-digit energy savings when a crawl space is sealed and conditioned instead of vented. Add health hits from spores and musty volatile organic compounds, and this problem is not just cosmetic. It is structural, financial, and respiratory.
Symptoms You Can See And Smell
If you need detective tips, start with your nose. Musty odors mean microbial growth is active somewhere, and crawl spaces are prime suspects. Next, look at floors. Cupping shows as edges higher than centers on hardwood planks. Doors that stick and seasonal trim gaps also hint at humidity swings. If you can peek inside the crawl space, watch for visible mold staining on joists, damp insulation hanging like a soggy sweater, efflorescence on foundation walls, ponding water, or a paper-thin, torn vapor barrier that never had a chance. A simple hygrometer reading over 60 percent in the crawl is a red flag. Over 70 percent is basically an engraved invitation to mold.
What Is A Conditioned Crawl Space?
A conditioned crawl space is not just a plastic sheet tossed on the dirt. It is a sealed, insulated, and dehumidified mini-basement that sits inside the building envelope. Done correctly, it includes:
Vents sealed shut and all rim joists, penetrations, and cracks air sealed so outside humidity stays outside. A continuous ground vapor retarder that covers the entire floor and wraps up the walls, with seams overlapped and taped, and piers sealed. Foundation walls insulated where code and climate call for it, rather than stuffing fiberglass into the floor joists and praying. Mechanical dehumidification sized for your square footage, climate, and leakage. In some cases, a small supply of conditioned air is introduced by the HVAC or the dehumidifier is ducted for even distribution. The result is a stable 45 to 55 percent relative humidity zone that starves mold and keeps wood dry and happy.
The Step-By-Step Fix
Drainage And Bulk Water Control
Before you touch plastic or bring in a dehumidifier, you stop liquid water. Grade the soil around the house so it slopes away. Clean and extend downspouts at least 6 to 10 feet from the foundation. If your crawl space sees seepage or seasonal standing water, install interior drainage trenches and a sump pump. This is the security guard that keeps groundwater from crashing your dry party.
Seal Vents And Air Leaks
Those old-school vents are moisture funnels, not solutions. Seal them. Then go after cracks and penetrations at the rim joist, plumbing and electrical holes, and any gaps around ducts. Spray foam, caulk, and rigid patches are your go-tos. The goal is to stop humid outside air and critters from walking in uninvited.
Install A Real Vapor Barrier
Your crawl space floor should not breathe into your home. Install a continuous polyethylene vapor barrier, 6 mil minimum, preferably thicker if it is a high-traffic or service area. Overlap seams 6 to 12 inches and tape them. Run the barrier up foundation walls at least 6 to 12 inches and fasten it. Wrap and seal around piers. The barrier is only as good as its seams and edges, so be meticulous. This is the most common place homeowners undercut the whole project.
Insulate Smart
In many climates, insulating the interior of foundation walls performs better than stuffing the floor. Rigid foam or closed-cell spray foam are common. If code allows, get the crawl space inside the conditioned envelope, which smooths temperature swings and makes dehumidification easier. If floor insulation is already in place and in good shape, you can keep it, but do not let it hide moisture issues. Wet fiberglass is mold’s favorite scarf.
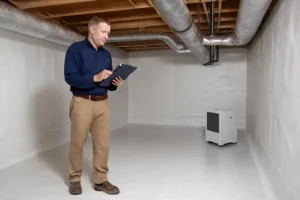
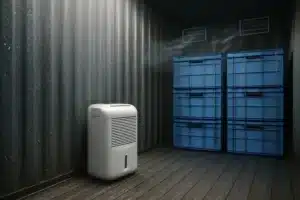
Right-Sized Dehumidifier
This is the heart of a conditioned crawl space. A crawl space dehumidifier is not the same as a bargain basement unit made for a spare bedroom. Choose a unit rated for lower temps and higher duty cycles. Place it where air can circulate, and plan for continuous drainage to a floor drain, sump, or condensate pump. Target 45 to 55 percent relative humidity, all year. Do not rely on passive venting. It is not 1987 anymore.
Tie It Together
In some homes, a small supply of conditioned air from the HVAC helps balance the space. In others, a ducted dehumidifier distributes dry air to hard-to-reach bays. Close any returns from the crawl space that would draw air into the living area. The idea is to control the crawl space, not use it as a return plenum.
Maintain It
Set a reminder to check your hygrometer monthly the first season. Confirm the dehumidifier is running, draining, and not flashing error codes. Glance at the vapor barrier edges for damage. Change filters on the unit as recommended. Five minutes of attention saves five figures of repairs.
How To Size Your Dehumidifier
Right-sized equipment is not a guess. Dehumidifiers are rated in pints per day at standard test conditions around 80 degrees Fahrenheit and 60 percent relative humidity. Real crawl spaces often run cooler or wetter, which cuts actual water removal. If your space is leaky or vented, size up. If your climate is hot-humid, size up. If your vapor barrier is thin or poorly sealed, size up again. When in doubt, aim higher capacity. A unit that idles at partial load will usually last longer than a smaller unit running full tilt 24-7.
| Crawl Space Size | Moderate Moisture | High Moisture or Hot-Humid |
|---|---|---|
| Up to 1,000 sq ft | 70 to 90 PPD | 90 to 110 PPD |
| 1,200 to 1,500 sq ft | 110 to 130 PPD | 130 to 165 PPD |
| 1,500 to 2,300 sq ft | 145 to 180 PPD | High-capacity or two units |
| Over 2,300 sq ft | 180 to 235 PPD | Very high capacity or multiple units |
Adjustments that matter:
If the crawl space is vented or obviously leaky, bump capacity one line higher than the table shows. If there is no effective vapor barrier or you can see damp soil, consider doubling the capacity target. In hot-humid regions like the Southeast and Gulf Coast, add 15 to 25 percent. Irregular layouts, low-clearance zones, and partitioned sections may need a ducted unit to push dry air farther. Keep in mind that a 70 PPD rating on paper is at lab conditions. At 65 degrees and 70 percent RH, that same unit will pull less water. Oversizing is not wasteful when humidity is the enemy.
Real-World Benefits You Feel
Odors go away when the food source and humidity go away. Encapsulation locks soil gases under a sealed barrier and the dehumidifier keeps relative humidity below mold’s happy zone. That stops the musty vapor trail wafting up through your subfloor. Your hardwood floors behave like the pricey finish they are. No more chronic cupping fed by damp air rising from below. Framing stays stronger when fungi are not nibbling on it. Fewer spores and dust mites mean easier breathing for allergy and asthma sufferers. As a bonus, your HVAC does less wrestling with steamy summer air leaking in from a vented crawl. Many homeowners see lower energy bills once the crawl space is sealed and conditioned. It is a cleaner, tighter house that smells like nothing at all, which is the goal.
Mistakes Most Homes Make
People often throw a thin plastic drop cloth on the dirt, call it good, and then wonder why it still smells like a wet log. Weak barriers and sloppy seams do not stop vapor. Leaving vents open with a dehumidifier running is another classic. That is like running AC with all the windows open. Under-sizing the dehumidifier is right up there too. A 50 PPD portable unit from a big box store will suffer in a 1,500 square foot crawl space. Skipping drainage fixes and trying to dehumidify standing water is a losing fight. Finally, ignoring maintenance turns a great system into a loud paperweight. Filters clog, drain lines clog, and sensors fail. Little checkups prevent big headaches.
FAQ
Do I Still Need A Dehumidifier If I Seal The Vents?
Yes. Sealing vents and air leaks stops a major moisture path, but soil vapor and everyday infiltration still raise humidity. A dehumidifier holds the line at 45 to 55 percent RH through seasons and storms. Passive venting does not track changing weather or load.
Will A Plastic Ground Cover Alone Fix Musty Odors?
A good vapor barrier is critical, but it is not the whole fix. If edges are loose, seams are open, water seeps in, or vents are still open, odors will likely persist. Encapsulation is a package: drainage first, then air sealing, then a sealed vapor barrier, then controlled dehumidification.
What About Insulating The Floor Instead Of The Walls?
Insulating the floor can help in some cases, but it does not control humidity in the crawl space itself. A damp crawl will still feed odors and mold. Insulating walls and bringing the crawl space inside the envelope pairs better with dehumidification and usually improves energy performance.
How Low Should I Set The Humidity?
Target about 50 percent. Anywhere in the 45 to 55 percent band is great. Going much lower can increase energy use without extra benefit, and trying to sit right at 60 percent leaves you flirting with mold growth.
What If I See Standing Water In Heavy Rains?
Handle drainage before anything else. Extend downspouts, improve grading, add a sump and interior drain if needed. Dehumidifiers remove vapor, not puddles. Trying to dry out an active leak with a dehumidifier is like bailing a boat with a spoon.
Should I Duct My Crawl Space Dehumidifier?
If your crawl space has tight bays, long runs, or partitions, ducting helps distribute dry air evenly. In more open layouts, a centrally placed unit with good clearance may be fine. The goal is uniform humidity across the space, not a dry corner and a swampy back wall.
Can I DIY Crawl Space Encapsulation?
Yes, if you are methodical, comfortable with tight spaces, and ready to tackle drainage, sealing, and mechanical work. The most common DIY misses are inadequate sealing, thin materials, and under-sized dehumidifiers. If you are unsure, get a professional moisture assessment and a written scope. The cost of redoing a failed encapsulation is usually higher than getting it right once.
How Do I Know If My Dehumidifier Is Big Enough?
Watch the RH trend. If your unit runs nonstop and still hangs above 55 to 60 percent, you are under-sized or still taking in outside moisture. Check for open vents, leaks, or a torn barrier, and consider stepping up to the next capacity class.
Ready For A Cleaner, Drier Crawl Space
If you are tired of musty hallways and wood floors that look stressed out, stop letting your crawl space run the show. Get the water out, seal the leaks, install a real vapor barrier, and set a right-sized dehumidifier to guard the line. If you want it scoped by someone who does this every day, we are happy to crawl, meter, measure, and give you a straight plan. Either way, treat the crawl space like part of your home, not an outdoor shed under your feet. Your nose, your floors, and your utility bill will thank you.