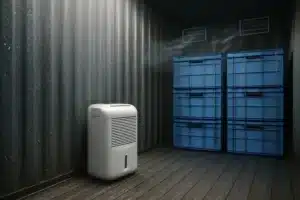
If your crawlspace smells like a wet gym sock that retired under your house, odds are mold is cashing rent checks down there. Crawlspaces are sneaky. They look dry for a week, then a humid afternoon rolls in and boom: condensation on ducts, musty joists, and tape peeling off that bargain plastic you tossed over the dirt. I own a water, mold, and fire damage company, and I see the same crawlspace encapsulation pitfalls again and again. The fix is not magic, and it’s definitely not a single roll of thin plastic. It’s a sequence: stop liquid water, create vapor barrier continuity, seal the vents and penetrations, manage the air with a real dehumidifier or conditioning, then monitor like you mean it. Do it in the wrong order and you trap moisture. Do it right and you starve mold year-round.
Why Vapor Barrier Continuity Matters
A crawlspace liner that looks like Swiss cheese does not count as a moisture strategy. Vapor travels from soil to air through the path of least resistance, which is always that unsealed seam, the gap at the wall, or the jagged cut around a pier. That is why vapor barrier continuity is the make-or-break detail. You want a continuous, durable membrane that covers the entire soil, climbs the walls, and wraps the piers, with tight seams that are sealed and mechanically secured.
Material quality is not a footnote here. Thin 4 to 6 mil poly tears if you blink at it. You crawl on it once to change a filter and it rips, the edges curl, and moisture takes the off-ramp right through the opening. Professional-grade reinforced liners in the 10 to 20 mil range hold up, resist punctures, and stay put. Seams need at least a 6 to 12 inch overlap and a mastic-compatible seam tape designed for crawlspaces, not generic duct tape that dries out and gives up. At the edges, run the liner up the foundation walls and secure it. Termination bars and masonry fasteners beat glue-only jobs, especially on rough block walls. Around piers, fully wrap and tape the liner to the pier wrap. Leaving a gap is like drilling a hole in your boat because you ran out of caulk.
If you want mold prevention instead of mold theater, every inch matters. The floor, the walls, the piers, the seams, and the penetrations are part of the same system. Miss one and the moisture finds it.
Crawlspace Encapsulation Pitfalls
Some crawlspaces look like a greatest hits record of mistakes. Here are the chart toppers that keep us busy with remediation calls.
Partial or weak vapor barriers. Tossing 6 mil plastic loosely on the dirt without taping seams or running it up the walls is a starter kit for disappointment. Vapor simply bypasses the liner at the edges and seams.
Open vents and air pathways. Foundation vents that stay open in the summer pull in warm, humid air. It cools in the crawlspace, relative humidity spikes, and now your ducts and joists are sweating. Unsealed rim joists, plumbing penetrations, and unwrapped piers are invisible doorways for moisture and air.
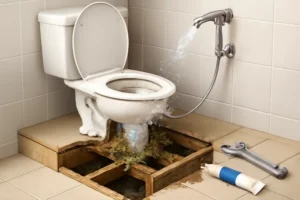
Active water sources ignored. Bad grading, missing downspout extensions, clogged gutters, and groundwater seepage create standing water. If you encapsulate over that, you just trapped a swamp under plastic. Plumbing leaks are another frequent offender that turn a good encapsulation into a science experiment.
No dehumidification. A vapor barrier handles soil moisture, not all moisture. Concrete, block, and the air you let in will still add humidity. Without dehumidification or conditioning, relative humidity often sits north of 60 percent. That is mold country.
HVAC and duct leaks. Leaky return ducts in the crawlspace can pull humid, musty air into your system and pressurize or depressurize the space in all the wrong ways. Cold supply ducts sweat when humidity is high, soaking insulation sleeves and feeding mold behind the scenes.
Insulation blunders. Fiberglass stuffed between floor joists often works like a sponge. It hides condensation, sags, and rains fibers while mold takes the penthouse suite. Insulating the crawlspace walls with rigid foam and air sealing rim joists is typically the smarter play in a sealed crawlspace.
Mis-sequencing the work. Sealing vents first while there is still standing water is how you build a terrarium. Installing a liner before fixing drainage, or adding a dehumidifier without sealing the envelope, sets you up to fail. The order matters.
Open Vents and Air Leaks Invite Mold
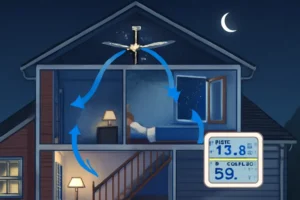
Let’s talk simple physics with a side of real-world pain. In summer, outside air in many regions often sits around 75 degrees with 70 percent relative humidity. Push that air into a crawlspace that stays near 65 degrees and the relative humidity in that air rockets toward saturation. At about 64 degrees, that air hits its dew point. That is when sweat appears on ducts, nails, and the face of your insulation. Mold does not care that the floor above feels fine. It cares that the surface it is sitting on is at or below dew point while the air is humid enough to feed it.
Open vents are the big valve that feeds this mess. Small leaks count too. Gaps at rim joists, plumbing penetrations, and chases allow infiltration that undermines your encapsulation. If your liner is tight but your vents are open, you will still see condensation and musty odors. If your vents are sealed but your seams are gapped and your piers are unwrapped, moisture comes up from the soil. The problem is synergy in all the wrong ways.
HVAC issues amplify it. A return leak in the crawlspace turns that area into a pathway for humid air. Supply leaks can drop temperatures and make condensation worse. Misrouted dryer vents or bath fans blowing into the crawlspace add gallons of water to the air every day. That is like watering mold with a hose.
Fix Water Before Plastic
Before you get excited about shiny white liners, make sure there is no bulk water intruding. Encapsulation is not a substitute for drainage. Start outside. Gutters need to be clean and sized right. Downspouts should discharge at least 6 to 10 feet away from the foundation or into solid piping that routes downhill. Grade should slope away from the house. If water sheets toward your wall, it will find its way under your liner later.
Inside, any sign of standing water calls for a perimeter drain and sump pump. A properly installed interior drain at the footing with washed stone and a filter fabric, tied into a sealed sump basin with a reliable pump and check valve, moves groundwater out before it touches your liner. Sump discharges should go to daylight or a storm line that is not feeding back into your foundation. If plumbing leaks are present, fix them first. Do not seal a wet crawlspace and hope the plastic wins the fight. It will not. You will only trap moisture where you cannot see it.
Dehumidification and Air Control
Once you control liquid water and create a sealed envelope, you still have ambient humidity to manage. Your goal is to maintain relative humidity around 45 to 55 percent in the crawlspace. That level starves mold and keeps wood moisture content out of the danger zone.
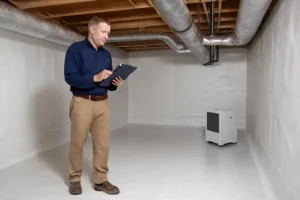
In most climates, a dedicated crawlspace dehumidifier is the dependable option. Look for a unit designed for low-clearance spaces with a rated capacity that matches your cubic footage. Many homes land in the 70 to 120 pints per day range, but sizing depends on volume, infiltration, and load. Hard-pipe the condensate to a sump or a condensate pump. Do not rely on a bucket you will forget to empty. Place the unit so air can circulate across the entire crawlspace, and seal off dead zones with better liner continuity and smart baffle placement if needed.
Some homes benefit from conditioning with a small supply air feed from the HVAC system, but only if the crawlspace is fully sealed and the system is designed thoughtfully. Never exhaust bath fans or dryers into the crawlspace. Insulate walls with rigid foam rated for below grade, seal seams with compatible tape and foam, and air seal rim joists with closed-cell spray foam or foam board carefully cut and sealed. The floor above often needs no insulation if the crawlspace is sealed and conditioned, though local codes and comfort goals vary.
The Sequence That Works
Here is the order that stops mold instead of creating a plastic-wrapped swamp. Sequence is everything.
- Assess moisture sources. Check grading, gutters, downspouts, irrigation overspray, and any signs of groundwater. Inside, look for plumbing leaks, wet soil, efflorescence on block, and condensation points on ducts and pipes.
- Fix drainage and liquid water. Correct the grade, extend downspouts, add splash blocks or solid piping, install an interior perimeter drain and sealed sump if needed, and repair all plumbing leaks. Pump out any standing water and let the crawlspace dry.
- Install a continuous, durable vapor barrier. Use 10 to 20 mil reinforced poly. Overlap seams 6 to 12 inches, tape with crawlspace-rated tape, run the liner up foundation walls, and secure it with termination bars. Fully wrap and tape around piers and columns. Protect high-traffic paths with an extra layer or pads.
- Seal vents, penetrations, and rim joists. Close and insulate foundation vents. Air seal all pipe and wire penetrations. Address chases and gaps. Treat the rim joist with closed-cell spray foam or sealed foam board, and make sure dryer and bath exhausts terminate outside.
- Add dehumidification or conditioning. Set a dehumidifier to maintain 45 to 55 percent RH. Provide a continuous drain. Consider a small, controlled supply from the HVAC if designed by a pro and supported by a fully sealed envelope.
- Monitor year-round. Install a hygrometer or smart sensor and check readings seasonally. Inspect liner tension, seam tape, and termination bars periodically. Service the dehumidifier filter and drain line so it keeps doing its job.
Skip or scramble any of these and you will likely be calling me in six months to remove moldy fiberglass and start over.
Case Files From the Trenches
Case 1: The pretty plastic fail. A homeowner laid down 6 mil plastic with a few rocks as paperweights, left vents open for “fresh air”, and called it good. Summer hit. The crawlspace ran 68 degrees while outside air rode in at 75 and humid. Condensation formed on ducts, insulation got soggy, and the joists climbed to 19 percent moisture. Musty odor spread to the first floor. We pulled the brittle plastic, corrected downspouts that ended at the foundation, installed a perimeter drain and sealed sump, then wrapped the crawl with 12 mil reinforced liner lapped up the walls and around piers. We sealed vents, spray foamed the rim joist, installed a 90-pint dehumidifier with a hard drain, and set it to 50 percent. Four weeks later, wood moisture content sat below 13 percent and the odor was gone.
Case 2: The misrouted exhaust mystery. Another home had a decent liner and sealed vents, but humidity would not drop below 65 percent. We traced the issue to a bath fan and a dryer exhausting into the crawlspace. Every shower and laundry cycle was fogging the place. We rerouted both to the exterior, sealed the penetrations, tightened a leaky return duct, and added a small supply to temper air. The same dehumidifier suddenly had an easy life holding 50 percent RH. This is a classic lesson: even a good encapsulation loses to bad air paths.
Maintenance and Monitoring
Encapsulation is not a set-and-forget project. A tight system still needs care. Check humidity quarterly. If RH creeps over 60 percent for more than a day or two, something changed. Rainy season with long wet spells can do it, but so can a loose seam or a stuck dehumidifier drain. Inspect the liner annually for rips, curled edges, and loose termination bars. Pay attention to high-traffic locations near scuttle openings and around mechanicals. Keep a roll of compatible seam tape and a small kit to patch scuffs before they grow.
Service your dehumidifier by cleaning or replacing filters and flushing the drain line. Algae and sediment buildup can block condensate flow. Testing the condensate pump and the sump pump with actual water is better than trusting the green light. Confirm the sump discharge line is clear and does not ice up or backflow. If your crawlspace uses wall insulation, scan for any gaps or delamination on foam seams and touch up with compatible sealants. If wood moisture content testing is part of your routine, target 12 to 15 percent for the win, and do not let it live above 16 percent.
Smart sensors help you catch problems early. A pair of battery-powered RH sensors at opposite corners, plus one near the dehumidifier, gives you a quick read. Add a floor water alarm near the sump or low points. These are cheap wins compared to mold remediation and structural repair.
Quick Specs That Prevent Regret
Here is what tends to work when you want durable results instead of repeat headaches:
| Component | Recommended Approach |
|---|---|
| Vapor barrier | 10 to 20 mil reinforced poly, white or clear, Class I, seams overlapped 6 to 12 inches and taped, run up walls and around piers |
| Wall attachment | Termination bars with masonry anchors, compatible sealant at top edge |
| Piers and columns | Full wrap with liner or compatible wrap, seams taped airtight to floor liner |
| Vents | Sealed with rigid covers and insulation, no open screens |
| Drainage | Clean gutters, downspouts extended 6 to 10 feet, perimeter drain to sealed sump where needed |
| Dehumidifier | Crawlspace-rated, sized to cubic footage, setpoint 45 to 55 percent RH, hard drain to sump or condensate pump |
| Insulation | Rigid foam on walls, sealed seams, rim joist air sealed with spray foam or foam board |
| Monitoring | At least two RH sensors, annual liner inspection, quarterly device checks |
FAQ
Do Crawlspace Vents Stay Closed After Encapsulation?
Yes. In a sealed crawlspace, vents should be closed and insulated. Leaving vents open invites humid air that condenses on cool surfaces. If you want conditioned air in the space, add a small, controlled supply from HVAC or rely on a dedicated dehumidifier, but do not reopen vents.
Is A Vapor Barrier Alone Enough To Stop Mold?
No. A vapor barrier reduces soil moisture, but air leaks, concrete, and occupant activity still add humidity. Without sealing vents and penetrations and adding dehumidification or conditioning, relative humidity often stays too high for mold prevention. Vapor barrier continuity is critical, but it is only one piece of the system.
Is 6 Mil Plastic OK For My Crawlspace?
It is cheap, not OK. Thin liners tear, shift, and do not hold seams well. Use 10 to 20 mil reinforced poly, tape the seams properly, and secure the edges with termination bars. The extra cost pays for itself by not failing the first time someone crawls across it.
Should I Insulate The Joists Or The Walls?
In a sealed crawlspace, wall insulation with rigid foam is usually better. It keeps the thermal boundary at the perimeter and avoids stuffing fiberglass in joists where it traps moisture and grows mold. Air seal the rim joist. If you keep a vented crawlspace, floor insulation is required in many climates, but that is a different strategy with different risks.
How Dry Is Dry Enough?
Aim for 45 to 55 percent relative humidity measured in the crawlspace air. Wood moisture content should land below 16 percent and ideally around 12 to 15 percent. If readings climb, troubleshoot infiltration, drainage, and dehumidifier performance.
Why Are My Ducts Sweating Even With A Liner?
Because the air is still humid. Open vents, leaky returns, or an undersized or failed dehumidifier keep RH elevated. Cold ducts will sweat any time surface temperature dips below the air’s dew point. Fix the air leaks, seal the envelope, and manage humidity.
Can I DIY The Seams And Piers Later?
You can, but it is like patching a leaky boat from inside while you are underway. Seams and piers should be fully sealed during installation. Every unsealed gap is a moisture path that undermines your results. If you already installed a liner, go back and wrap the piers and retape seams with the right materials.
Will A Small Fan Venting Outside Help?
That usually backfires. Pulling air out depressurizes the crawlspace and can draw humid outside air in through leaks, or draw air from the house down into the crawlspace. Stick with a sealed envelope and controlled dehumidification or conditioning.
Ready For A Crawlspace That Stays Dry?
If you are staring at a partial liner and a lineup of open vents, you do not need another roll of plastic. You need a plan that goes in the right order: stop liquid water with grading, gutters, and drains, then create vapor barrier continuity on floors, walls, and piers, seal the vents and rim joist, manage the air with a real dehumidifier or conditioning, and keep an eye on it with smart monitoring. That is how you stop hidden mold from the gaps that most people miss. If you want it done without guesswork, bring in a crew that lives in crawlspaces and does not mind getting a little muddy to keep yours bone dry.