Your floor is talking. Not with creaks and squeaks, but with shape. When hardwood starts curling like a potato chip or arching like a cat, it is telling you exactly where moisture is getting in and what to do next. If you read the clues right, you save your floor. If you guess and grab a sander too soon, you can lock in a permanent defect that costs far more than a careful, data-driven dry out. Let’s decode hardwood cupping and hardwood crowning, track the source, and keep you from making the mistake every impatient homeowner makes.
Spot the Difference
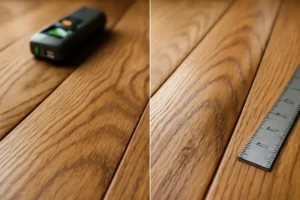
Start with your eyes and a straightedge. Place the straightedge across several boards. If the edges sit higher than the center, you have hardwood cupping. If the center sits higher than the edges, you have hardwood crowning. Cupping is a concave shape. Crowning is convex. That simple geometry tells you a lot about where the moisture came from and what happened next.
Here is the quick cheat sheet you need during that first walk-through:
| Board Shape | Likely Moisture Source | What It Tells You |
|---|---|---|
| Cupping | Moisture from below the floor | Subfloor, slab, or crawlspace is wetter than the room air or board tops |
| Crowning | Moisture from above, or sanding too soon | Surface spills, steam cleaning, or a floor that was sanded while still cupped and wet |
Both problems are about imbalance. Wood is predictable, and it moves most across its width. When one face of a board is wetter than the other, it wins the tug of war and the board curves.
Where Is the Water Coming From?
If you see hardwood cupping, expect the underside to be loaded with moisture. Common culprits include a damp crawlspace without a proper vapor barrier, standing water in a basement, seasonal ground moisture wicking through an unsealed slab, a dishwasher line that leaked down through the subfloor, or a recent water loss that was dried at the surface but not at the subfloor. If you are on a concrete slab, even a minor slab vapor emission can raise the underside moisture content for months if there is no effective vapor retarder below the slab or between slab and wood.
If you see hardwood crowning, look up and around. Surface spills that sat too long, over-wet mopping, pet accidents, plant pot leaks, or steam mops can wet the face of the boards. Another frequent path to crowning is user error during refinishing. If someone sands a cupped floor before it is truly dry, the sander removes more wood from the high edges. Later, when the underside finally dries and the board flattens, the now-thinned edges sit low and the center looks crowned. That is a permanent profile until you refinish again, and sometimes not even a full resand will fix it if the wear layer is already thin.
Pro tip with attitude: your floor is not mystical. Cupping points down. Crowning points up. Start your investigation in the direction of the curve.
How Wood Reacts to Moisture
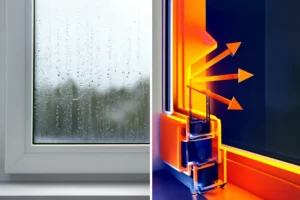
Wood is hygroscopic. It exchanges moisture with the air until it hits an equilibrium moisture content that matches indoor relative humidity and temperature. It swells as it takes on moisture and shrinks as it dries. Most of that movement happens across the grain, which is why board width changes are real and length changes are minor.
When the bottom of a board is wetter than the top, the bottom swells more and the edges lift into a cup. When the top is wetter than the bottom, the top swells more and the center arches into a crown. If an installer or a DIY warrior sands a cupped floor while the imbalance still exists, the sander skims off the higher edges. Later, as the board equalizes and tries to flatten, there is less wood at the edges than the center, so the top looks permanently crowned. That is the sanding trap we will talk about more in a moment.
There is one more sneaky wrinkle. If boards are swollen for a long stretch, the tongue-and-groove joints can compress. When the wood finally dries, those compressed fibers do not spring fully back. The result can be small gaps and shapes that do not go perfectly flat even after a careful dry out. That effect is called compression set, and it is one reason patience and monitoring matter before you refinish.
The Sanding Trap
Put the sander down. If the floor is cupped, sanding before the moisture is gone is a surefire way to get hardwood crowning later. This is not a myth. It is physics, and it will bite your wallet.
Here is the only safe playbook. First, eliminate the moisture source and dry the system until the boards stabilize. Second, verify moisture content at the board surface and the underside. Use a pin meter for accuracy on solid hardwood, and take paired readings top and bottom in several rooms. You want the top and bottom of the boards to be within about 1 to 2 percentage points of each other, and you want flooring and subfloor to be within a small difference band, typically 2 to 4 percentage points depending on plank width. Third, track those numbers over several days to confirm they are stable, not just momentarily low because you blasted a fan at it.
Only once the floor is dry and flat should you start sanding. If you are working with engineered hardwood, confirm the remaining wear layer can take another resand. If not, replacement may be smarter than grinding your way to paper-thin veneer and regrets.
Drying and Monitoring the Right Way
Drying hardwood is not a race. It is a controlled glide to a safe landing. Start by fixing the source. A leaky icemaker line, a failed wax ring at a toilet, negative pressure pulling humid crawlspace air through gaps, or a missing slab vapor retarder will keep feeding moisture until you address it. Do not skip the source hunt. Without it, any refinishing is a short-term patch.
Next, set the indoor environment. Run HVAC to maintain moderate temperature and relative humidity. A target of 40 to 50 percent RH is friendly for most homes. If conditions are humid, add a dehumidifier. If the subfloor is wet, lift a few boards in a discreet area or use directed floor drying panels to pull vapor through the seams. Use air movers to move air across the surface, not to blast heat into the floor. Overheating wood can cause checking and finish damage.
For concrete slabs, consider moisture testing methods that look beyond a quick surface check. If you are planning to reinstall hardwood over a slab, you want a proven moisture mitigation plan when slab relative humidity or emissions are high. That can include topical mitigation systems or a properly rated underlayment designed to manage vapor.
Monitoring is not a single snapshot. Create a log. Take daily moisture readings at consistent points. Pin meters are best for solid hardwood. Pinless meters are useful for mapping anomalies, but confirm with pins. Track ambient temperature and relative humidity as well. When the numbers plateau within target ranges and the cup relaxes, you are ready to make finishing decisions. If the shape stays stubborn and you have already done a thorough dry out, compression set or severe water staining may call for sanding or selective board replacement.
If You See Cupping
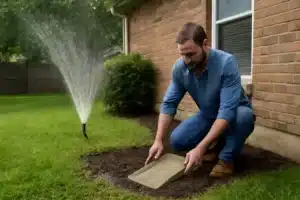
Your job is to slow down and stabilize. Pull up any wet rugs or mats. Stop wet cleaning. Set your HVAC to a normal occupied setting, not Arctic blast or sauna mode. If you have a crawlspace, peek in there. If you see bare dirt or condensation on ducts, you just found a likely suspect. A ground-cover vapor barrier and conditioned or dehumidified crawlspace can be the difference between a flat floor and a wavy one. If you are on a slab, look for perimeter cracks, failed sealants at transitions, and exterior drainage issues pushing water under your slab.
Do not try to clamp, screw, or nail the boards flatter. That only masks the symptom while the moisture keeps chewing on the structure. Get a moisture assessment, start controlled drying, and watch the numbers. Many cupped floors flatten significantly within weeks once the source is handled. If the finish is rough after flattening, then you can plan a sand and refinish. Timing is everything.
If You See Crowning
If you spilled water or had a one-time event that soaked the top surface, start by drying the surface calmly. Wipe up free water, run the HVAC, and add dehumidification. Avoid space heaters aimed at the floor. Give it time and monitor moisture content. If the crowning appeared after a recent refinish, you likely have a sanding-too-soon situation. Those are painful because the shape is now locked into the profile that was sanded. In mild cases, a full resand after the floor truly dries can help. In severe cases, expect board replacement in the worst areas, then refinishing.
Watch for dark discoloration. Black staining around edges or at seams can be tannin reaction or microbial staining after prolonged wetting. Those stains usually will not sand completely out. If they are widespread, replacement may be more realistic than chasing perfection with sandpaper.
Repair or Replace?
When clients ask if we can save a floor, we look at five things. One, how long it stayed wet. Two, how high the moisture content got. Three, whether there is delamination or buckling that broke fasteners or adhesive. Four, the thickness of the wear layer if it is engineered or previously sanded solid. Five, the level of staining or cupped shape remaining after a full, measured dry out.
Solid hardwood with moderate cupping that dries within a few weeks often sands beautifully once stable. Engineered hardwood can also be saved if the face veneer is thick enough and there is no delamination. If the floor buckled off the subfloor, if the tongue-and-groove failed, or if engineered layers separated, replacement is the smart call. If the wear layer is already thin or you see nail heads after past sandings, replacement beats grinding through what is left. A good restoration team will give you options with actual measurements rather than guessing from the doorway.
Preventing Round Two
Preventing hardwood cupping and hardwood crowning is not a mystery. Keep indoor humidity in a stable band year round. Many homes live happily between 30 and 50 percent relative humidity. Add a dehumidifier during sticky months and use your HVAC fan settings wisely so air circulates. On concrete, use a rated vapor retarder or underlayment and respect slab moisture tests. In crawlspaces, cover the ground with a continuous 6 to 10 mil vapor barrier, seal vents if you are converting to a conditioned crawlspace, and use a dehumidifier sized for the volume.
Avoid steam mops on hardwood. They drive moisture into the top surface and get you closer to crowning. Use cleaner the manufacturer approves, wring mops well, and keep water usage light. Wipe spills immediately. Put absorbent mats near sinks and under pet water bowls. Check fridge lines, dishwasher hoses, and ice maker connections annually. Small habits cost less than new floors.
FAQs
Can cupped floors flatten on their own?
Yes, if you remove the source and dry the system carefully. Many cupped floors relax significantly over a period of weeks as the top and bottom reach equilibrium. If the floor stayed wet for a long time and the joints compressed, it may not go perfectly flat. That is when a measured resand is used to refine the surface after full drying.
How long does drying take?
There is no single clock. A light wetting with good conditions may normalize in a week. A saturated subfloor or damp crawlspace can take several weeks. Track moisture content daily and do not start sanding until top and bottom readings are close and steady for several days.
Is cupping the same as buckling?
No. Cupping is a gentle concave shape where the board edges lift slightly. Buckling is a severe failure where boards lift off the subfloor, sometimes by inches. Buckling means the floor lost attachment and you have a major moisture event. That needs immediate professional help and often replacement.
Will a dehumidifier fix cupping?
A dehumidifier helps control the air, which helps the top of the board and the room environment. If the moisture is coming from below, you also need to dry the subfloor or address slab or crawlspace conditions. Pair room dehumidification with directed drying and source repair for real results.
What moisture content should wood be before sanding?
Typical indoor targets for solid hardwood land around 6 to 10 percent depending on climate and season. More important than a single number is balance. Top and bottom of the board should be within about 1 to 2 percentage points of each other, and flooring should be within a small band of the subfloor, generally 2 to 4 percentage points depending on plank width. Confirm stability over time before sanding.
Can engineered hardwood cup?
Yes, though often less dramatically than solid. The plywood core resists movement, but the veneer face can still react to moisture imbalance. Engineered floors can also delaminate if water gets between layers. Check for loose layers or hollow sounds when you tap. That is a red flag.
Can I screw or nail cupped boards down?
Do not do it. Fastening a cupped board flatter without fixing the moisture guarantees stress, squeaks, and future failure. Dry first, verify with meters, then decide if sanding or board replacement is needed.
Why did my floor crown after refinishing?
It was almost certainly sanded while cupped or while moisture imbalance still existed. The sander removed more wood at the raised edges. Once the floor dried and flattened, the edges were too thin, leaving a crown. Prevent this by waiting for balanced moisture content across the board thickness before sanding.
Does insurance cover cupping or crowning?
Policies vary. Sudden and accidental water losses such as burst pipes are often covered. Long-term seepage, humidity, and maintenance issues usually are not. Document the source, timing, and your mitigation steps. A professional inspection with moisture maps helps support a claim when a covered event caused the damage.
Call in the Pros
If your hardwood is shape-shifting, you do not need guesswork, you need measurements. Our team reads floors for a living. We track moisture top and bottom, map hidden wet spots, stabilize the environment, and dry subfloors the right way so you do not trade cupping for crowning. If sanding is smart, we tell you when, not just how. If replacement is the better investment, we will say that too. The goal is simple. Fix the source, dry methodically, verify with data, and only then touch the sander. That is how you keep a beautiful hardwood floor from turning into a very expensive lesson in impatience.