Wildfire season sends embers far ahead of the flame front, often miles downwind. Those tiny firebrands sneak through gaps, lodge in dry debris, then spark attics, roofs, decks, and siding. The good news is that simple upgrades block ember entry before ignition. Start with ember resistant vents tested to recognized standards, pair them with a Class A roof, build a zero to five feet noncombustible zone, keep gutters and decks clean, then follow a quick post fire check if your home sees ember fall. These steps form the backbone of wildfire home hardening, and they do not require a full rebuild to make a real difference. For help with planning or pro installation, our team delivers fire damage restoration & home hardening services that fit real budgets and real timelines.
Why embers ignite homes
Most houses lost in wildfires do not go up when a wall meets a wall of flame. Loss often starts when wind driven embers pile into places that can catch quickly, like vents, gutters, deck gaps, fence connections, and the first five feet around the structure. Cal Fire explains that firebrands can travel long distances in strong winds, fall into receptive fuels, then build heat until ignition occurs. Blocking ember entry and removing easy fuels within arm’s reach of the structure changes that script significantly. See Cal Fire’s guidance on home hardening for a clear picture of how embers attack openings and near home fuels. Cal Fire home hardening
Independent testing programs back up these priorities. The Insurance Institute for Business and Home Safety outlines a focused checklist that places vents, roofs, gutters, and the five foot buffer right at the top. Homes that meet these standards reduce ignition points in predictable ways. That is why our crews start every wildfire hardening assessment with those elements before discussing larger rebuilds. IBHS Wildfire Prepared Home
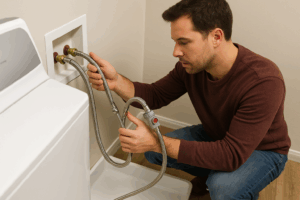
Ember resistant vents that work
Attics and crawlspaces breathe through soffit, eave, foundation, and gable vents. That airflow is needed for moisture control, which matters for mold prevention and building life. The problem during a wildfire is that open vents become ember inlets. The fix is not to seal vents shut. The fix is to use tested ember resistant vents that allow sufficient airflow while trapping or blocking embers.
Look for products that reference testing to ASTM E2886, a recognized method for evaluating exterior vents under ember showers and radiant heat. Cal Fire also maintains guidance on acceptable vent details, including corrosion resistant metal mesh at one eighth inch openings or finer. Many modern ember resistant vent assemblies combine fine stainless mesh with an intumescent layer that swells under heat to shut the vent. That extra layer buys time during heavy ember exposure. Read more about the test method on ASTM and review Cal Fire’s vent recommendations before you buy. ASTM E2886 Cal Fire vents
Not all vents on a home are the same. Soffit vents sit under the roof edge. Eave vents may be continuous strips or individual units. Foundation vents allow crawlspaces to breathe. Gable vents sit high on wall peaks. Each location sees different wind pressures during a fire event. A full plan calls for matching vent style to location and making sure every opening in the building’s shell resists ember entry. Many manufacturers publish installation notes that cover airflow targets, corrosion resistance, and field conditions in coastal or high humidity regions. For product examples, review technical pages from companies that publish test data, then compare airflow ratings to your attic’s requirements. Vulcan Vents EmbersOut
Retrofit or replace
Homeowners usually face two paths. One option is a full replacement with new vent assemblies that have integrated ember screens and heat reactive layers. This route provides strong performance when installed correctly. The second option is a retrofit screen or cover that mounts over an existing vent. That path can cut cost and time, yet it requires diligent fitment at the edges so embers do not bypass the screen. Retrofit screens also need periodic cleaning since finer mesh catches more lint and dust. If a vent’s surrounding wood or stucco shows gaps or rot, replacement often makes more sense. When in doubt, a short assessment helps you pick the right level of work for each opening. IBHS vent guidance
Quick vent planning checklist
Use a simple plan before you shop. Count every vent by type and size. Note any damage at the edges. Choose products that cite ASTM E2886 testing or a Cal Fire listing and confirm corrosion resistant metal components to prevent early failure. Match airflow ratings to your attic or crawlspace needs so moisture control stays on track. Seal any cracks around frames with approved sealants after installation. If you need help with counts or sizing, our team can visit the property and map each opening during a same week appointment. ASTM E2886 schedule a home hardening assessment
Roof upgrades with Class A rating
The roof covers the largest horizontal surface on your home. Embers settle in roof valleys, rake edges, and around dormers. Weak points at the roofline turn small ember piles into flame that can leap to underlayment or exposed edges. A Class A roof resists flame spread and helps keep embers from pushing ignition through the covering. Common Class A coverings include fiberglass asphalt shingles, metal panels, concrete or clay tile, and slate. FEMA publishes clear material guides with roof covering performance summaries. Cal Fire also highlights the value of a metal drip edge at the roof perimeter since it shields the edge from ember buildup. FEMA roofing materials Cal Fire roof tips
Condition matters as much as material. A Class A roof with missing shingles or tile gaps still leaves pathways for embers to reach sheathing. Keep all valleys, ridges, and gutters free of needles and leaves. Look for daylight at roof to wall transitions, then repair flashing so embers do not enter under the cover. If your roof is at end of life, upgrade to a Class A system with fire rated underlayment. A metal drip edge ties the system together by shielding the edge and reducing direct ember contact with wood fascia. UC ANR also provides good context on how building codes handle these details in wildfire zones. UC ANR guidance
During maintenance, treat skylight curbs and solar attachments as potential ember traps. Seal penetrations with high temp rated sealants recommended by the manufacturer. Confirm that any exposed foam under tile is covered with mortar or bird stops. Simple attention to small openings cuts ignition pathways without a full roof replacement.
Zero to five feet ember zone
The first five feet around the structure is where embers collect fastest. Wind creates eddies that drop firebrands at the base of walls, on steps, at corners, and along patios. Cal Fire and IBHS both call for a noncombustible zone in this band. Replace bark mulch with gravel or stone. Use pavers or concrete near entry doors. Choose noncombustible planters or place containers farther away. Keep irrigation functional so any allowed plants in this zone stay green and short. These changes reduce the chance that a small ember pile grows into flame that impinges on siding or jumps into vents. Cal Fire Zone Zero IBHS five foot buffer
Move stacked firewood beyond the five foot line. Relocate lumber, toys, outdoor cushions, and plastic bins. If a wood fence attaches directly to the house, break that connection with a short section of metal or a masonry pier right at the structure. That transition stops flame from running along a wood fence toward your wall. If you have vents close to grade, add clear space in front of them so leaf litter cannot build into a dense mat. That small step keeps vents breathing while cutting the fuel load that embers need to ignite. Cal Fire fence and zone tips
Zero to five feet quick checklist
- Replace combustible mulch with gravel, rock, pavers, or concrete.
- Move firewood, lumber, propane cylinders, and plastic bins beyond five feet.
- Break wood fence connections at the house with a noncombustible section.
- Clear decks of cushions and planters during fire weather. Keep the area under the deck clean or enclose it with noncombustible materials.
- Clean roofs and gutters so no debris falls into this zone during wind events.
These items take a weekend, sometimes less. The change in ignition risk is immediate. If you want a print friendly version for your project binder, ask us for our one page zero to five feet checklist when you book an assessment. schedule a home hardening assessment
Gutters decks and attachments
Gutters catch embers along with leaves. Dry debris in a metal gutter can still ignite from embers and then flame can touch roof edges. Clean gutters at least monthly during fire season or after wind events. Metal gutters handle heat better than vinyl, and a metal gutter guard that resists ember penetration keeps debris out. Pair guards with a metal drip edge at the roof edge for a cleaner, safer joint. UC ANR has a detailed summary on gutter choices and maintenance in wildfire prone areas, including how different guard types perform during ember showers. UC ANR gutters guide Cal Fire gutters guidance
Decks deserve careful attention. Embers fall between deck boards, collect on exposed joists, and pile where the deck meets the wall. Keep the deck surface swept during fire season. Do not store anything under the deck. If your deck is low to the ground, enclose the sides with a noncombustible skirt that still allows ventilation and drainage. If you plan a new deck or a major rebuild, review options for ignition resistant decking that has been tested for wildfire exposure. Our article on deck and patio fire safety tips walks through practical ways to cut risk on patios, grills, and outdoor kitchens as well.
Attached structures like pergolas, trellises, shed roofs, and carports can also transfer flame. Keep combustible fabrics off those features during red flag days. Use noncombustible roofing on attached patio covers. Seal joints where these features meet the house so embers cannot slip behind trim boards. IBHS and Cal Fire summarize how attachments can bypass other hardening steps if left unchecked. Treat each connection as a potential ember pathway and close it off. IBHS attachments Cal Fire attachments
Small fixes with big effect
A tube of sealant and a weekend can remove many ember pathways. Weatherstrip garage doors so gaps at the sides and top disappear. Add metal sweeps at the base of doors. Seal penetrations for hose bibs, conduit, cable, and gas lines where they enter walls. Fit spark arresters on chimneys using corrosion resistant mesh with the right opening size. Replace brittle window screens with metal screens that fit snugly. These tweaks cost little compared to the fire risk they remove. Cal Fire and IBHS both highlight these small details across their checklists. Cal Fire checklist IBHS checklist
If your home is older, pair these quick fixes with targeted retrofits that improve resilience across hazards. The right bundle of upgrades often qualifies you for insurance incentives or faster underwriting in high risk zones.
Post fire cleanup checks
Even if your home stays intact after a nearby wildfire, embers and smoke leave traces that deserve attention. Start with the roof and gutters once it is safe to access. Look for smoldering debris at valleys and behind chimneys. Clean gutters as soon as local conditions permit. If you find melted guards, charred fascia, or any signs of heat damage, photograph everything before you touch it. Cal Fire post fire tips
Check vents next. Smell the attic for smoke or a warm odor. Look for small char spots near vent openings, bird stops, or at ridge caps. If anything seems off, do not enter tight spaces without proper protection. Smoldering insulation can reignite hours later. Call a professional who knows how to ventilate, wet down, and check surfaces with a thermal camera. Our team covers these steps during emergency calls so homeowners do not take on that risk alone. ASTM vent context post fire cleanup & hidden hazards
Inside the home, note any persistent smoke odor, soot on sills, or tripping breakers. If breakers will not reset or you see heat marks at outlets along exterior walls, have a licensed electrician inspect. Do not run HVAC until filters are replaced and ductwork is assessed for soot. Record each finding and time stamp photos. Call your insurer to start a claim and contact a restoration firm for triage if you see any structural or smoke related damage. We can board openings, set negative air, clean soot safely, then rebuild if needed. fire damage restoration & home hardening services
First 72 hour quick checks
- Roof and gutters. Remove smoldering debris. Photograph any heat damage.
- Vents and attic. Check for smoke odor or smoldering insulation. Call for help if anything looks suspicious.
- Interior. Watch for electrical issues, soot deposits, or hot spots at exterior walls.
- Documentation. Photograph everything. Contact your insurer and a restoration professional.
If prevention fails
Even a well hardened home can suffer damage during extreme events. Early professional response limits secondary damage from soot, water used to extinguish spot fires, or hidden charring. Our estimators walk you through repair options from smoke cleaning and deodorization to structural repair. If you want a sense of what to expect, read our guide on fire restoration costs & cleanup. It breaks down common line items, timelines, and ways to balance scope with budget. If smoke odor lingers later, our background in mold and moisture also helps with HVAC cleaning and dehumidification that many fire jobs need.
Book an assessment
If you want clear steps, a materials list, and pricing for your property, schedule a home hardening assessment. We map every vent, check your roof edge, evaluate gutters, walk the zero to five feet zone, then give you a phased plan. You choose what to handle DIY and what to hand off. We can coordinate roofers and vent installers, supply gutter guards, and deliver cleanup support after fire weather events. Start with the highest impact items first. Your home will be safer with each upgrade.
FAQs about home hardening
What is an ember resistant vent
It is a vent designed to pass airflow while blocking embers. Look for one eighth inch or finer corrosion resistant metal mesh, a housing that resists heat, and in many products an intumescent layer that swells under heat to restrict openings. Many products reference ASTM E2886 testing which simulates ember exposure and radiant heat. Pricing varies by vent count and size. For a tailored estimate, contact our team to review your openings and locations. ASTM E2886 schedule a home hardening assessment
Should I replace my roof for a Class A system
If your roof is near end of life or already planned for replacement, a Class A system is one of the best upgrades for wildfire resistance. If your current roof still has service life, focus on clean gutters, a metal drip edge, sealed edges, and ember resistant vents right now. When the time comes to reroof, choose a Class A covering with rated underlayment and keep valleys and edges clean. Cal Fire offers guidance for these decisions. Cal Fire roofing advice
How often should gutters be cleaned during fire season
Plan on monthly checks during fire season or after major wind events. Homes near tall trees may need shorter intervals. A noncombustible gutter guard can cut maintenance, though it does not remove the need to inspect. After a fire event with heavy ember fall, clean gutters as soon as local officials say it is safe to access your roof. Cal Fire seasonal tips
Will retrofitting vents reduce attic airflow too much
Quality ember resistant vents provide published airflow values so you can size them correctly. During a retrofit, match the net free area to your attic’s needs. If the new product has a lower airflow per unit, you may install additional units to maintain proper ventilation. Keeping airflow correct prevents moisture problems and mold growth while still blocking embers. Manufacturers provide airflow data, and our team calculates net free area during assessments. vent airflow examples
Do deck upgrades really change fire risk
Yes. Removing debris between boards, clearing storage under the deck, and keeping cushions off the deck during fire weather cuts ignition pathways. If you rebuild, select decking and guard assemblies with higher ignition resistance. Small changes at the house to deck joint also matter. Read our deck and patio fire safety tips for practical steps that take a morning, not a season.
Putting it all together
Start where embers win most often. Block openings with ember resistant vents tested to recognized standards. Keep the roof clean, sealed, and covered with Class A materials at replacement time. Transform the first five feet around your home into a noncombustible buffer. Fit metal gutters with guards, add a drip edge, then keep decks clear. Seal small gaps with simple materials. Follow a quick post fire check after any nearby event. If you want a field tested plan for your home, we are ready to help with fire damage restoration & home hardening services or an appointment to schedule a home hardening assessment. Blocking embers at the weak points is the simplest way to prevent ignitions, and it pays off the next time the wind picks up.