If you want a steam shower or home sauna without the funky spots that show up like an unwanted roommate, you came to the right corner of the internet. This guide shows you how to pick the right steam shower vapor barrier, set the ceiling so it does not rain on your head, and meet sauna ventilation requirements that actually clear moisture. Add a quick post use drying routine and mold will have to find a new hobby.
Quick heads up before we get into the nuts and bolts. Mold needs moisture, and it does not need much time to move in. Dry damp materials within 24 to 48 hours and you cut off its food supply. That is straight from the EPA. We will link the receipts below. If you already suspect growth behind finishes or around odd corners, take a look at our guide to hidden mold hotspots and then keep reading to prevent a round two.
Why moisture control stops mold
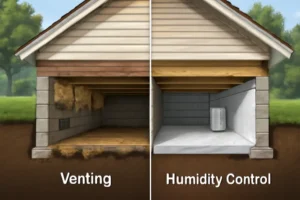
Mold does not care how pretty your tile is. It cares about moisture and time. Keep relative humidity under control and dry surfaces quickly and you tilt the game in your favor. The EPA puts it bluntly. Dry wet or damp materials within 24 to 48 hours and mold growth is far less likely. That means your bathroom or sauna room needs a plan for steam, drips, and humidity after you finish your session. Fans, correct membranes, and smart layout make the difference between a spa you love and a maintenance headache. Source: EPA mold and moisture guide.
Steam shower basics for vapor control
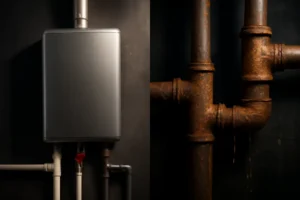
There is a difference between waterproof and vapor tight. Waterproofing blocks liquid water from getting into the wall assembly. A vapor barrier or vapor retarder slows steam from migrating into the framing and insulation. In a steam shower you want both. Tile with grout is not a vapor barrier. Liquid membranes that work fine in a regular shower may not have a low enough perm rating for a steam environment. The tile industry and membrane makers like Schluter and Laticrete are very clear about this distinction. See Schluter water management guidance.
Perm ratings and targets
Manufacturers test vapor transmission with ASTM E96 and report a perm rating. Lower is tighter. For residential steam showers that run intermittently, you want a membrane with low permeance. Many tile references treat less than or equal to 1.0 perm as suitable for this use. For commercial or continuous use steam rooms, look for less than or equal to 0.5 perm and follow the product instructions to the letter. Always check the datasheet for the exact number and approved installation method. Reference: Schluter.
Vapor barrier product options
There are a few common membrane families that are rated for steam rooms. Sheet membranes are popular because their perm ratings are predictable and they seam well with factory accessories. Examples include:
Schluter KERDI DS. A low perm sheet membrane designed for demanding steam room applications. You will find perm data and steam room methods in the Schluter handbook and product literature. Start with the Schluter Shower System handbook and the water management article linked above.
Laticrete HYDRO BAN Sheet Membrane. Laticrete lists this sheet membrane for steam applications and publishes perm data on the datasheet. See HYDRO BAN Sheet Membrane product info.
NobleSeal type sheet membranes. Noble Company produces sheet membranes used in steam rooms as well. Check the specific datasheet for perm rating and steam room approval on your chosen Noble product.
Pros of sheet membranes include consistent perm, reliable seams, and clear steam room methods. Liquids can play a role for detail work, but many are not low perm enough to act as the only vapor retarder. Always read the fine print. Laticrete explains this in their waterproofing FAQs.
Construction tips that prevent mold
Steam is relentless. The way you layer materials and deal with seams, penetrations, slope, and insulation is what keeps that steam in the shower instead of the stud bay. Get the vapor control layer right and every other detail gets easier.
Correct vapor barrier placement and materials
The vapor retarder belongs on the warm and wet side of the assembly. In practice that means directly behind the tile and thinset. Most steam shower methods in the TCNA handbook use a sheet membrane that is applied to the face of a stable backer like cement board or foam board. The tile goes on top of the membrane. The membrane is continuous across walls and the ceiling, and it wraps into a compatible waterproof shower pan system. Use the manufacturer seam tape, seaming paste, and preformed corners so you get a continuous layer without pinholes.
Penetrations are the sneaky path for vapor. Niches, body sprays, light fixtures, speakers, and shower arms all need careful detailing. Pre slope niches so water drains out. Use compatible gaskets or collars for fixtures. After the tile goes in, you are not done. Seal escutcheons and trim plates with a neat bead of high grade silicone to avoid vapor bypass.
Ceiling slope and height
Flat steam ceilings turn into drip city. Condensation builds and then it drips right on your head. The fix is simple design. Industry references for steam rooms call for a steep slope so condensate runs to the wall. A common rule is two inches of slope for every foot of run. You will see this in tile industry coverage as well as manufacturer instructions. See TileLetter on ceiling slope.
Keep ceiling height reasonable. Super tall steam rooms hold more vapor and take longer to purge. Most home steam showers live comfortably in the seven to eight foot range. Lower height also reduces heater runtime and makes your post use dryout faster.
Backer boards, insulation, and sealed penetrations
Pick a stable backer rated for wet areas, such as cement board or foam board from the same system as your membrane. If you are framing an exterior wall that will be part of the steam shower, add continuous insulation and avoid cold spots. Cold surfaces attract condensation. Closed cell foam in the cavities combined with a continuous interior membrane and careful sealing at studs reduces the risk of vapor getting cold inside the wall.
Plan your valve and accessory locations so you avoid unnecessary cuts in the membrane. Every hole is a potential leak for vapor. Where you must penetrate, use a factory gasket or a preformed seal. In the finished bathroom, check those seals during your monthly inspection and refresh with silicone if you see gaps.
If you have finishes like wallpaper just outside the steam enclosure, be careful. Trapped moisture behind paper can feed mold. If you ever need to remediate that area, use safe methods. Our guide on removing mold under wallpaper walks through that process.
Sauna ventilation requirements
Saunas are a different animal than steam showers, but the moisture story remains. A good sauna feels fresh, not stuffy, and it dries fast after use. That comes down to intake and exhaust placement, correct free air area, and a fan plan that actually moves air. Most electric sauna manufacturers want you to hit several air changes per hour and to place the intake near the heater and the exhaust high on the opposite wall. Finnleo spells this out in their construction notes. See Finnleo sauna construction guidance.
Intake and exhaust placement
Fresh air intake goes low and close to the heater. Some guides allow it slightly above the heater depending on the model. This feeds the heater with oxygen rich air and keeps temperatures even near the floor. Exhaust goes high on the opposite wall, under the ceiling, so hot humid air can exit. If you install a louvered opening for passive exhaust, leave a clear path for air to flow back to the larger room. For a mechanical exhaust, use an inline fan that is rated for high temperature service and mount it outside the hot room. Many heater manuals include a sketch of this pattern. Example manual reference: sauna heater instructions with vent sizing.
Mechanical vs passive and CFM tips
A small private sauna can sometimes get by with passive exhaust if the intake and exhaust are sized well and the door does not seal like a bank vault. Electric saunas in tight homes often benefit from mechanical exhaust to clear humidity after a session. Manufacturers commonly reference three to six air changes per hour for residential units. To get a rough CFM target, multiply the room volume by your target air changes and divide by 60. Example. A room that is 6 by 7 by 7 feet has a volume of 294 cubic feet. At six air changes per hour, you want roughly 29 to 30 CFM. That is not a huge fan, but the duct path and backdraft damper matter. An inline fan mounted outside the hot room with a short, smooth duct run will perform better and make less noise. Always follow your heater maker for exact vent size, clearances, and air movement expectations. Again, Finnleo and your specific heater manual are your roadmap.
Set an actual routine for the exhaust. A simple wall timer or a smart control keeps the fan running long enough to dry wood benches and lower humidity. If you like gadgets, consider smart humidity sensors & automation so the fan runs until relative humidity drops to your set point.
Steam room waterproofing details
A steam room is a shower that went to finishing school. It demands precise work at every seam and transition. A few best practices our crews like in both remodels and new builds:
Use a full sheet membrane on the walls and ceiling, and connect it to a compatible shower base system so you avoid mixed products that may not tie together. Prime dusty boards so the adhesive or thinset bonds well to the backer. Pre fill fastener holes where required by the system. Double check that the membrane wraps cleanly into any corner benches and that the top of a bench slopes toward the drain.
For doors, go with a steam rated enclosure with tight gaskets. Use a transom window you can crack open after use to jump start the dryout. If your design uses transom glass, plan the upper wall reinforcement during framing so the glass hardware has a solid bite without cutting through your membrane.
After every use drying routine
This is the secret sauce. A two minute habit right after a steam or sauna session plus a short follow up makes the space dry fast. That is what keeps mold from getting a foothold.
Two minute routine
- Open the door or pop the transom to vent the first burst of steam. For saunas, open the exhaust fully.
- Run the bathroom exhaust fan on high or the sauna exhaust for at least 10 to 20 minutes.
- Wipe benches, glass, and any pooled water with a microfiber towel.
Thirty to sixty minute follow up
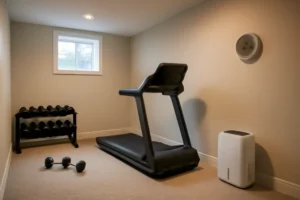
- Run an inline exhaust or a portable fan that pushes air out of the room for 30 to 60 minutes.
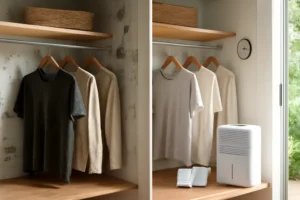
- If relative humidity is still above 60 percent, run a dehumidifier until you are down near 45 to 50 percent.
- Check seals and caulking once a month and re caulk if you spot cracks.
These steps line up with the EPA guidance to dry materials within 24 to 48 hours. Get the area dry same day and you are staying ahead of growth.
When to call pros
If water got out or you find spots that smear when you wipe them, get help. If the affected area is larger than a dinner table, or if you have health concerns, do not DIY. If a supply line popped or a shower pan failed, the clock is ticking and rapid drying matters. We handle emergency water extraction and structural drying so your project moves from wet to ready for repairs as quickly as possible.
Curious what your insurer covers or how deductibles interact with mold exclusions. We wrote a plain English guide on insurance and mold claims. If you want a feel for budget ranges, our water damage cost guide breaks down common scenarios and cost drivers.
Local service and booking
Worried about hidden moisture, soft drywall around your steam shower, or a sauna that never seems to dry. Book a moisture inspection with All Nation Restoration and we will map the moisture, check ventilation performance, and give you a clear action plan. If you just had water exposure from a leak, call now for emergency water extraction. Fast drying is the name of the game.
Pro tips that save headaches
Put lights and speakers outside the steam envelope when possible. If you must install them inside, pick steam rated fixtures and detail the penetrations carefully. Avoid recessed can lights in the steam ceiling. Surface mount behind a wet rated trim or use a low profile fixture built for steam rooms.
Choose grout that plays well with steam. Epoxy grout is less porous than cement grout, which can help reduce absorption and simplify cleaning. If you love cement grout, plan to seal it regularly and keep your drying routine tight.
Clean with products that do not leave residue. Residue grabs moisture like a magnet. A neutral cleaner and a rinse beat heavy soap every time. If you see early signs of mildew on caulk, strip and replace instead of spot scrubbing forever.
For gyms, spas, and heavy use
If you are planning a sauna or steam room for a multi user space, design and ventilation need to be dialed tighter, and cleaning protocols matter even more. Start with a fresh air plan that moves more air per hour, specify rated membranes, and deliver clear staff routines for daily dryout.
Safe cleanup and health notes
If you encounter visible growth while remodeling, wear gloves and a proper respirator and set basic containment so you do not spread spores around the home. People with asthma, severe allergies, or anyone who is immune compromised should not handle mold cleanup. If the area is large, if sewage was involved, or if you suspect growth in wall cavities, call a professional. See the EPA guide for PPE and cleanup basics.
Simple layout checklist
Steam shower
- Low perm sheet membrane rated for steam rooms with manufacturer approved seams and corners.
- Ceiling slope of two inches per foot, with height around seven to eight feet.
- Backer board that suits wet areas, sealed penetrations, and insulated exterior walls.
- Steam rated door with gaskets and a venting plan using a transom or door gap for fast dryout.
Sauna
- Fresh air intake low and near the heater.
- Exhaust high on the opposite wall, either passive with a clear path or mechanical with an inline fan.
- Target three to six air changes per hour unless your heater manual says otherwise.
- Timer or smart control for post session fan run time. Add a hygrometer so you can see when you are below 50 percent RH.
Frequently asked questions
Do I need a vapor barrier for my steam shower?
Yes. An enclosed steam shower needs a low perm vapor retarder that is approved for steam rooms. You also need waterproofing. A sheet membrane like Schluter KERDI DS or Laticrete HYDRO BAN Sheet Membrane is commonly used because the perm rating is low and seams are reliable. Always check the product ASTM E96 perm data and follow the manufacturer steam room method. See Schluter guidance.
How steep should my steam shower ceiling be?
Use a steep slope so condensation runs to the walls rather than dripping on you. Industry references often call for two inches of slope for every foot of ceiling run. This rule appears in tile industry articles and installation manuals. You can read a good rundown at TileLetter. Keep ceiling height modest so the space dries quickly.
How should a sauna be ventilated?
Place the fresh air intake low and near the heater and the exhaust high on the opposite wall. Many manufacturers suggest three to six air changes per hour for private saunas. Small electric saunas often benefit from a mechanical exhaust to move humidity after you are done. Always follow your heater manual for vent size, placement, and clearances. Reference: Finnleo sauna construction.
How long should I run the fan after using a sauna or steam shower?
Start venting immediately. Leave the door or transom open for a few minutes and run the exhaust for at least 10 to 20 minutes. Keep the fan or an inline exhaust running for 30 to 60 minutes until relative humidity drops below about 50 percent. The EPA advises drying damp materials within 24 to 48 hours to avoid mold. Source: EPA mold guide.
What membrane should I pick for a residential steam shower?
Pick a sheet membrane with a published low perm rating and explicit steam room approval. Schluter KERDI DS, Laticrete HYDRO BAN Sheet Membrane, and similar sheet products are common choices. Verify the perm rating on the datasheet, use the manufacturer accessories for seams and corners, and follow the steam room method from the TCNA handbook. Links are in the sources below.
Can I just use a liquid membrane in a steam shower?
Some liquid membranes can be used in steam rooms only when the manufacturer allows it and when perm targets are met. Many liquids by themselves are not low perm enough for continuous steam. Read the product literature and do not assume a regular shower method applies to a steam enclosure. When in doubt, use a sheet membrane rated for steam.
Sources and further reading
EPA. A Brief Guide to Mold, Moisture, and Your Home
Schluter. Water Management for Tiled Showers
Schluter Shower System Installation Handbook
Laticrete. HYDRO BAN Sheet Membrane