If your indoor jungle doubles as a mini rainforest, you are feeding more than your tomatoes and monsteras. High humidity, standing runoff, and that slippery biofilm are a mold magnet. As a restoration pro who spends Monday through Sunday cleaning up after “watered a little too much,” I want your plants thriving without your drywall turning into a petri dish. Here is how to nail hydroponic humidity control, tighten houseplant runoff management, keep biofilm off your gear, and safely clean up if moisture sneaks behind walls or under floors.
Why Mold Shows Up Around Plants
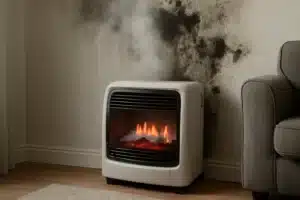
Mold and biofilm love the same conditions your plants do: moisture, mild warmth, and organic residues. Hydroponic nutrients and soil mixes are a buffet for microbes. Add stagnant air and standing water in saucers, trays, or under a tent and you have conditions where mold can start within 24 to 48 hours after a wetting event. That faint musty odor behind the grow rack, the darkened baseboard by the plant corner, or the squishy plank near the reservoir is your early warning light.
Biofilm is that slimy layer on pipes, trays, and reservoir walls. It shelters bacteria and fungi, clogs lines, and makes disinfectants less effective if you do not scrub first. Let it ride and it can seed mold on nearby building materials. Indoors, the stakes are higher because humidity and spillovers do not just stress plants, they can soak drywall, MDF furniture, and baseplates. Those porous materials are mold chow.
Hydroponic Humidity Control
Keep grow area humidity in the sweet spot. For most indoor setups, aim for 45 to 60 percent relative humidity. Push past 60 percent and you are flirting with powdery mildew, Botrytis, and wall mold. During dense growth or flowering, staying closer to the lower half of that range helps. Use a digital hygrometer you can trust, and if your room or tent swings a lot, add a humidity controller to cycle dehumidifiers or exhaust fans automatically.
Portable dehumidifiers are the workhorse for rooms that run wet. Size them based on the cubic footage, water production, and your target RH. If the space is small or heat is a problem, a mini split or small AC unit pulls moisture while keeping temps steady. Empty reservoirs and wet trays late in the day and you just fed the overnight humidity spike. Water earlier in the light cycle so plants transpire and your gear dries before lights off.
Ventilation matters. In tents, run an appropriately sized inline exhaust that actually vents outside, not into an attic or a closet. Pair it with a passive or filtered intake and an oscillating fan or two to break up damp pockets of air under leaves. In open rooms, move air across the canopy and past wet surfaces, not just at one corner. Spacing and pruning are free humidity control. If leaves are stacked tight and the canopy is a wall of green, you are trapping moisture and spores.
Keep floors and walls from acting like sponges. Use waterproof mats under setups, elevate reservoirs and fabric pots on grates or risers, and avoid carpet anywhere near water. If you like misters and humidifiers for propagation, use them on timers with a strict target RH and keep them away from drywall. Over-misting corners is how we end up cutting out the bottom two feet of your wall.
Airflow, Spacing, And Timing
Good airflow is not just a fan pointed at the prettiest plant. You want gentle but constant air movement across the entire space, especially under the canopy and around trays where condensation likes to hang out. Lift leaves to feel for dead air spots. If it is muggy under there, you need more movement or pruning. Keep plants a few inches off walls so moisture is not trapped behind pots or tents. In small apartments, stick felt bumpers or spacers on the back of racks to create a consistent gap.
Timing matters. Watering early helps you avoid long, wet nights. Foliar sprays and heavy misting should never happen right before lights off. Stagger dense plants so leaves do not overlap like shingles. Use trellis nets and routine pruning to open up airflow pathways. The goal is to dry surfaces within a few hours after watering, not the next morning.
Houseplant Runoff Management
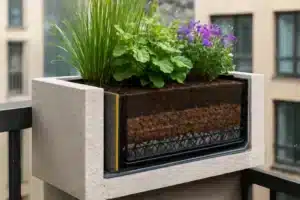
Letting runoff stew in saucers is a top source of moldy baseboards and funky floors. Houseplants are simple: water thoroughly, let the pot drain, then empty saucers after 10 to 15 minutes. For thirsty plants, use a saucer with a riser to keep pot bottoms dry between waterings. Bottom watering is great as long as you do not leave pots swimming for hours. Controlled drip rings or self-watering inserts can reduce splashing that wets walls and furniture.
Choose the right pot and media. Ensure there are real drainage holes, not decorative nubs. Use a porous mix appropriate to the plant, and add perlite or pumice if the soil holds water too long. For larger indoor corners, lay a waterproof tray or pond-liner under multiple plants, but tilt it so you can hand-vac or sponge out runoff easily. If your floor is luxury vinyl or laminate, keep in mind that seams can wick water. A waterproof mat under the entire plant zone is cheap insurance.
Grow tents and hydro tables need true drain-to-waste or recirculating lines that do not back up. If you are intentionally running 10 to 20 percent runoff in hydro, capture it. Do not let it creep under the tent or behind a rack. A small floor squeegee and a wet-dry vac should live next to your setup. Add a leak alarm sensor near reservoirs and at the lowest point of the room. Nothing humbles a grow like a 2 a.m. beep that saves your floor.
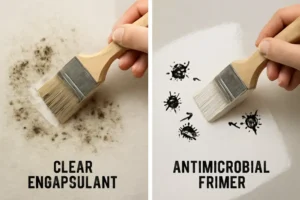
Stop Biofilm In Its Tracks
Biofilm starts as a thin, greasy layer inside tubing, on tray seams, and along reservoir walls. If your fingers feel slime, it is already there. Mechanical cleaning is step one. Drain the system, scrub with a non-scratch brush or pad, then rinse. Follow with a plant-safe cleaner that breaks down residues. Dilute 3 percent hydrogen peroxide works well for periodic sanitizing on equipment, not on roots. Mild acidic cleaners like diluted white vinegar can help dissolve scale before a final rinse. Enzyme-based cleaners can be effective for organic residues without nuking your root zone.
Build a schedule. Wipe touch surfaces weekly, do a quick tray and tubing scrub monthly, and deep clean reservoirs and lines between cycles. Swap or sterilize pre-filters, air stones, and small fittings regularly. Keep nutrients sealed and clean up spills immediately. The more sticky nutrients and leaf litter that sit on surfaces, the faster biofilm comes back.
Finding Hidden Moisture And Mold
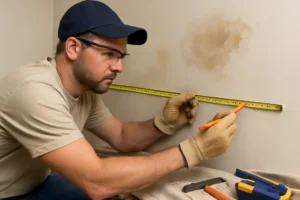
Hidden mold hides where water travels and air does not: behind baseboards, under LVP seams, under MDF benches, behind tents, and wherever runoff splashed a wall. If you smell musty air but see nothing, start with your nose and a moisture meter. Check baseboards and drywall near plant zones. Aim the meter a few inches above the floor and follow numbers that are higher than the same wall elsewhere. Thermal imaging can spot colder, wetter areas behind paint. If a plank clicks when you step, that joint may be swollen from water.
Look behind gear. Slide the rack forward. Tilt the reservoir to check the underside. Pull a baseboard if moisture readings spike or if you see discoloration on the caulk line. Mold tends to colonize the back side of drywall first, so a clean-looking painted face can hide a party behind it. If you find water staining or the paper face of drywall is soft, you have more than a wipe-down job.
Safe DIY Cleanup Steps
For small, accessible mold on hard, non-porous surfaces, a thoughtful do-it-yourself cleanup can be safe and effective. Suit up first. Wear nitrile gloves, eye protection, and at least an N95. If you are cleaning more than a few square feet or you are sensitive to mold, step up to a P100 respirator.
Contain the area. Turn off fans that could blow spores through the house and close nearby HVAC registers. Open a window if possible and add a box fan exhausting out to pull air away from the rest of the home. Bag clutter or porous items that are visibly moldy and cannot be cleaned. Do not drag them through the house uncovered.
Clean methodically. Start with a HEPA vacuum on surfaces to remove loose growth and dust. Follow with detergent and water on non-porous materials like metal, plastic, sealed tile, and finished wood. For disinfection, 70 percent alcohol or household 3 percent hydrogen peroxide can work on hard surfaces. Keep it simple, apply, keep it wet for a few minutes, then wipe and dry. Do not mix chemicals. Keep bleach away from porous materials. If you do use a diluted bleach solution on a non-porous surface, remove plants first and ventilate well because fumes are rough on leaves and lungs.
Dry fast. Dehumidify the room and keep airflow moving across cleaned areas until readings are back to normal and surfaces are fully dry. Your target is to get that space back under about 50 to 55 percent RH and to keep it there. Fix the cause at the same time: redirect runoff, empty saucers, add a drip tray, and set fans on a schedule.
What To Replace vs Clean
Porous building materials that got wet and stayed wet are usually not worth saving. If drywall is soft, stained, or smells musty, cut it out in a straight line and remove it at least 12 inches beyond visible damage. Wet MDF, particleboard shelving, and pressed furniture swell and crumble, which means they should go. Insulation behind a wet wall should be replaced, not sprayed and prayed. Solid wood can often be cleaned and dried if you catch it early, but check moisture with a meter to be sure it is back to baseline.
Non-porous items like plastic trays, metal racks, sealed pots, and glass can be scrubbed, disinfected, and put back in service. Fabric pots can be washed and sanitized if the fabric is structurally sound. Hoses and airlines are cheap; replace them when in doubt. If carpet got soaked near your plant zone, plan on pulling it. Padding holds moisture and spores. For luxury vinyl that swelled at seams, replacement may be the only clean fix.
When To Call Professionals
Call a pro when you are dealing with more than about 10 square feet of mold, when the source is inside walls or under floors, or when people in the home are reacting to odors or growth. If your meter shows elevated moisture behind drywall, do not play roulette with the utility lines inside that wall. Proper remediation uses containment, negative air, HEPA filtration, and removal of contaminated materials without aerosolizing the rest of your house.
If a spill, leak, or overwatering episode soaked wall cavities or seeped under flooring, you will want fast extraction and structural drying. Professional water extraction with targeted dehumidification and air movement stops mold growth in its tracks. If you want to see what that looks like, check out professional water extraction. For larger mold jobs or hidden growth, our mold removal services lay out how inspection, containment, removal, and antimicrobial treatment work.
Quick Gear And Setup Checklist
Here is what keeps home grows clean and your walls boring, in the best way:
- Digital hygrometer with data logging and a humidity controller.
- Appropriately sized dehumidifier or mini split that actually hits your RH target.
- Inline exhaust to the exterior, plus oscillating fans for canopy and under-canopy flow.
- Waterproof floor mats or trays, risers for pots, and a wet-dry vac within arm’s reach.
- Leak alarms near reservoirs and low spots, plus a squeegee for quick cleanup.
- Scrub brushes, plant-safe cleaners, 3 percent peroxide, and enzyme cleaner for biofilm.
- Moisture meter, utility knife, and painter’s plastic for small containment if you need to open a wall.
- Gloves, eye protection, and an N95 or P100 for cleanup sessions.
Common Mistakes To Skip
Running humidifiers to 70 percent RH in a room with drywall is asking for patch and paint. Watering late at night makes rooms steamy when air is stagnant. Letting saucers brim for days rots roots and feeds wall mold. Pushing plants tight against a wall traps damp air and hides leaks until the baseboard waves at you. Spraying bleach on fuzzy drywall, then closing the door, just gives you bleachy fuzz.
Plant Care Habits That Prevent Mold
Consistency wins. Water on a schedule based on plant needs, not on a guilt trip every time a leaf droops. Use your finger or a moisture probe to confirm when to water. Group plants with similar watering habits together so you do not flood the succulents while trying to keep a calathea happy. Keep nutrient mixes off floors and wipe any drips from lines and fittings. Vacuum and wipe the grow space weekly so dust and spores do not build up. Trim dead leaves before they hit the tray. If a plant is chronically soggy or musty, repot with a fresh, better-draining mix and check for root issues.
What About Powdery Mildew On Leaves?
Powdery mildew on foliage thrives when humidity and leaf wetness stay high. Fix the room first: bring RH down, improve airflow, and reduce leaf-to-leaf contact. Remove the worst affected leaves and dispose of them in a sealed bag. Avoid spraying harsh disinfectants on leaves. If you choose a plant-safe fungicide, follow the label and test on a small section first. Timing matters here too, so spray early in the day with lights adjusted to avoid leaf burn.
If You Have Kids, Pets, Or Sensitive Lungs
Keep chemicals minimal and simple. Alcohol and peroxide are generally friendlier for hard surfaces than chlorine solutions in occupied spaces. Never mix cleaners. Ventilate during and after cleanup. If anyone in the home is reacting to musty air or you have a history of asthma, skip DIY for anything beyond a light wipe of a small area. The goal is a dry, clean room without triggering symptoms.
FAQ
What humidity should I keep my grow room at?
For most indoor grows, 45 to 60 percent RH is a solid target. Keep closer to the lower end during flowering or dense growth. If you are propagating or rooting cuttings, you can run higher temporarily inside a dome or controlled micro-environment, not across the whole room.
How fast does mold start after a spill?
Mold can begin within 24 to 48 hours on wet, nutrient-rich or dusty surfaces. That is why fast extraction, airflow, and dehumidification after any spill or overflow is non-negotiable.
Is bleach the best thing for mold?
Not indoors on porous materials. Bleach does not penetrate drywall or wood well and the fumes are hard on lungs and plants. Use detergent and water on non-porous surfaces first, then alcohol or peroxide where appropriate. Replace damaged porous materials. If you must use diluted bleach on non-porous materials, remove plants and ventilate well.
How do I stop biofilm in hydro lines?
Scrub first, then sanitize. Drain, mechanically clean tubing and reservoirs, then run a plant-safe cleaner like dilute peroxide. Establish a regular cleaning schedule and keep nutrient spills off surfaces. Replace small-bore lines regularly because they are cheap and prone to buildup.
Can I clean mold behind baseboards without opening the wall?
If moisture readings are elevated or the wall smells musty, you will likely need to remove baseboards and cut out affected drywall to truly fix it. Surface wiping will not get the backside of the drywall or the plate. If that sounds like too much, call a remediation pro.
What should I put under my plant corner?
Use a waterproof mat or tray that covers the entire zone, with risers for pots. Add a slight slope so you can vacuum out runoff. Avoid carpet. If you have LVP or laminate, protect seams with a continuous liner.
Helpful References
For deeper reading on humidity ranges, biofilm, and hidden mold, these resources line up with the tips above:
- Humidity control in grow spaces: HydroGrowing Systems
- Hydroponic mildew prevention basics: SaferBrand
- Bottom watering benefits: Homes & Gardens
- Biofilm handling in cultivation: Cannabis Industry Institute
- Hidden mold signs and moisture timelines: All Nation Restoration and Professional Water Extraction