If you put holes in a roof, water will try to say hello. Solar panels are fantastic, but the mounting hardware that keeps those panels on your roof can be a slow leak waiting for its moment if the PV roof flashing and roof penetration sealants are wrong, missing, or tired. I own a restoration company. I meet the leaks after they have dripped through your attic, soaked your insulation, stained your ceiling, and started brewing mold. This guide shows you how PV mounts can let water in over time, how to prevent it with proper flashing and sealants, how to spot early attic leak signs before they blossom into interior damage, and when to call in pros for leak testing and drying before things get musty and expensive.
Why Solar Mount Holes Matter
Every lag bolt, standoff, rail foot, conduit penetration, and junction box screwed into your roof is a potential water path. The roof is a layered system that sheds water in one direction. When you pierce that system, you are betting on three things staying perfect: correct placement of the mount in the shingle courses, properly lapped PV roof flashing that kicks water back into the flow path, and sealants that stay flexible through heat, cold, rain, and ultraviolet abuse. Miss any one and you get a drip. Ignore a drip and you get rot, ruined drywall, and mold that does not care that you went green.
Leaks from solar panel roof penetrations rarely announce themselves with a waterfall. They start as pinhole seepage around a lag, a cracked bead of caulk, or a flashing lip that never made it under the upslope shingle. Thermal expansion and contraction make mounts wiggle a tiny bit through the seasons. That micro movement can crack cheap caulk and open a hairline gap. Capillary action does the rest. Rainwater follows the path of least resistance across fasteners and underlayment until it finds wood. Wood is thirsty. So is insulation. Neither is happy after a storm.
What Good PV Roof Flashing Looks Like
Old myth: a fat tube of roof goop solves everything. Reality: water sheds, not seals. The foundation of a dry install is metal flashing that slides under the shingle course above the mount. That flashing needs enough width and upslope coverage to direct water back onto the shingle field. If you are on asphalt shingles, the flashing should tuck under the upslope shingle and over the downslope course so gravity does the work. If you are on tile, you need purpose made tile hooks or adjustable flashings that interlock with the underlayment. On standing seam metal, penetration free clamps are king because you avoid holes entirely.
Modern PV mounting systems give you choices. Traditional sheet metal flashings remain the gold standard for keeping bulk water out. There are also self sealing mounts that use butyl or EPDM gaskets under a metal plate to create a chemical flashing. The best installers pair metal flashing with a pressure sensitive butyl pad or advanced sealant under the mount base. That combination handles movement and keeps water out without relying on a brittle caulk bead. Sealant is a backup. Flashing is the primary defense.
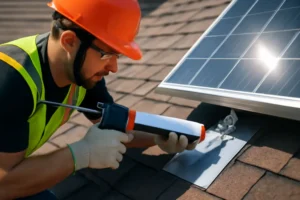
Details make or break it. The lag should bite a rafter, not just decking. The pilot hole should be predrilled and filled with the right sealant before the lag goes in. The flashing slot should be clean, not crammed over a nail head that lifts the metal and creates a tunnel for water. And the upslope edge should disappear under the shingle course above. If you can see daylight under the flashing or the plate sits proud, that is a red flag.
The Right Roof Penetration Sealants
Not all goos are created equal. Roof penetration sealants should be UV stable, rated for wide temperature cycling, and formulated to stretch and recover as the roof and mount move. Silicone, MS polymer, and butyl based products are the usual winners here. Acrylic painter’s caulk is not. Asphalt mastics get brittle and crack in the sun. Pick a sealant that bonds to your specific roof surface and mount metal, then use it as a belt to the flashing suspenders, not as the only barrier.
Where do you use sealant? Under the base plate over the pilot hole. Around conduit collars. On fastener heads if they are exposed. Under compression flashings. You do not smear it across shingle faces to build a dam. That traps water and debris. If your installer brags about how much caulk they used, that is not a flex. Good PV roof flashing does the heavy lifting. Roof penetration sealants are targeted and durable, not decorative.
Early Leak Signs To Catch Now
Most solar panel roof leaks start in silence. Your job is to be nosy after it rains.
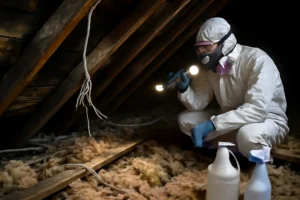
Head to the attic with a bright flashlight. Look for tan or brown tea stains on the roof deck around where the array sits. Check the insulation for damp clumps, especially under mount lines and beneath conduits. Press your fingers into the rafters. Soft wood or a darker band next to a fastener line is a leak hint. If you smell musty air up there, you are probably late to the party.
Indoors, scan ceilings for small rings, hairline cracks that look new, or paint that is starting to bubble or peel. Walk under the array path after a storm and sniff. A mild mildew odor that fades when the house dries out is a classic early warning. Pay attention to recessed light cans and ceiling penetrations because water likes to find existing holes on its way down.
After Storms, Check These Spots
High wind, hail, and sideways rain can push even good flashing to the limit. After big weather, take a careful look from the ground with binoculars or a zoom photo. You are looking for lifted shingles around the mounts, flashing plates that appear tilted or not seated flat, missing or cracked sealant at visible collars, displaced debris damming uphill of the array, and conduit supports that have loosened and let pipes rub the roof.
If you can safely access the roof and you are comfortable doing so, clear leaves and branches that trap water at the top edge of panels and around mounts. Check that roof jacks and pipe boots near the array are not cracked. Do not pry on panels or mounts. Do not step near the flashing upslope edges. If anything looks off, take pictures and call your installer or a qualified roofer. Meanwhile, call our team for moisture detection and an interior assessment if you saw stains or smelled dampness. The faster we confirm what got wet, the faster we stop mold from joining the party.
DIY Checks vs Calling Pros
Here is what you can do without turning your roof into a slip and slide. From the attic, look and sniff after any soaking rain. From the ground, inspect with binoculars and take photos. Keep gutters clear so water is not backing up under shingle laps. Trim branches that dump debris onto the array. Change HVAC filters more often if your attic got damp. That helps the home dry faster after storms.
Here is what belongs to pros. Opening shingles to verify flashing. Resetting or tightening rail feet and standoffs. Resealing or replacing the wrong sealant type. Performing controlled leak testing with moisture meters and thermal cameras. Setting up structural drying if the attic or ceiling got soaked. Trust me when I say you do not want to learn roof surgery on your own house. If you have any attic leak signs, call us for a moisture assessment. We will map wet materials, check humidity loads, and tell you whether you need roof work, drying, or both.
How Leaks Turn Into Mold And Repairs
Water inside a house is like a freeloading band. It does not just visit. It hangs around and trashes the place. Wet insulation insulates less and stays damp. Roof sheathing swells and delaminates. Drywall sags. And if the leak fed organic materials for 24 to 72 hours, mold can start colonizing behind the scenes. You may not see it for weeks. You will smell it sooner.
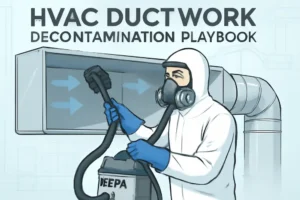
Our water damage restoration workflow is built to keep a small leak from becoming a big rebuild. First we find the water using moisture meters, thermal imaging, and good judgment. Then we stabilize the environment with air movers and dehumidifiers sized to the job. If there is bulk water in the insulation, we extract or remove it. We treat affected areas with the appropriate antimicrobial and then dry to verified targets before any repairs. Only when the structure is dry should you paint, patch, or close up a ceiling. If we confirm mold, we set containment, run HEPA filtration, remove mold damaged materials according to standards, clean what can be saved, and verify clearance. You can see how we handle this on our Water Damage Restoration page and our Mold Removal page.
Water Damage Restoration in Austin explains our drying process. Mold Removal in Austin covers inspection, containment, and remediation. If your solar array leak has been brewing for a while, use both.
Preventive Maintenance Checklist
You do not need a PhD in roofing to keep solar mount leaks off your to do list. You need consistency and the right priorities. Before installing a PV system, have the roof inspected and repaired where needed. It is cheaper to fix a five year old roof than to install on one that is already tired. Choose an installer that uses metal flashings that tuck under the upslope course and sealants designed for roofs. Make sure they pull permits and provide roof and workmanship warranties that spell out how penetrations are handled.
Once the array is up, schedule a yearly inspection. If your installer does not offer one, a reputable roofer will. They should verify flashing placement, check roof penetration sealants for cracking or UV damage, confirm that mounts are still tight to structure, and document any adjustments. Ask them to photograph each array anchor row and any conduit roof entries. Keep those photos year to year so you can spot changes after storms.
From the ground, keep debris off the array and out of gutters. After heavy rains or wind events, do that attic patrol with a flashlight. If odors or stains show up, act within days, not weeks. You will save real money by drying quickly and keeping mold out of the equation.
Case File: The Silent Solar Leak
We were called to a South Austin home with a strange problem. The homeowner noticed a faint musty smell in the living room after big rains, but the ceiling looked fine. The roof was five years old and had a two year old solar array. Attic inspection showed a six foot band of faint staining on the roof deck directly under the second row of panel feet. One standoff had a flashing plate that never slid far enough under the upslope shingle. The plate sat on a nail head that propped the upslope edge just enough to create a tiny water channel. The installer had globbed on asphalt mastic around the lag. Two summers later that mastic cracked. Water did what water does.
We mapped moisture in the insulation and found a wet zone down the bay. The drywall was still dry on the surface, but the back side had a 12 inch patch reading wet. We set a targeted drying chamber in the attic, removed saturated insulation in two bays, and coordinated with a roofer to reset the flashing and replace the wrong sealant with a butyl backed mount and a high performance silicone at the pilot. Drying took 48 hours. No mold remediation needed because we jumped early. The homeowner avoided a ceiling tearout and paint job because they caught attic leak signs right after a storm. Right process. Right order. Dry first, then fix the roof, then verify.
Insurance And Warranty Angles
Two quick realities. If a storm damages your roof or solar mounts and water makes it inside, homeowner’s insurance often covers the resulting interior damage, especially for sudden events. But they will want proof of maintenance and a clear cause. Keep install paperwork, warranties, photos, and annual inspection notes. If the leak started from workmanship errors or the wrong products, the solar installer or roofer may be responsible under their warranty. That is another reason to insist on metal flashing, documented roof penetration sealants, and correct placement in shingle courses. You want a paper trail that shows this was done the right way.
What About Conduit And Junction Boxes?
Mounts are not the only leak path. Electrical penetrations matter too. Conduit should go through purpose made flashings or boots and be sealed with compatible products that stay flexible. Junction boxes and combiner boxes mounted on the roof should be rated for wet locations. Use wet rated conductors. If you see a DIY foam job around a conduit or a box that looks like a cheap plastic tote lid, plan on upgrades. The same rules apply. Shed water with flashing first. Seal where you must with UV rated products. Then verify with a hose test before you call it done.
How We Test For Hidden Leaks
If you suspect a solar panel roof leak but cannot see the source, we can run a controlled diagnostic. That might include thermal imaging to spot cool evaporative areas on ceilings, pin type and pinless moisture readings in drywall and framing, and pressure washed hose testing run in sections starting at the lowest elevations and working upslope. We never flood the roof. We simulate rain and watch where water shows up. While we test, we protect interiors with plastic sheeting and drop cloths. Once we find the leak, we coordinate with the right trade to fix it while we handle the interior drying. You get one neck to ring, not five contractors pointing at each other.
Quick Wins To Stop Leaks Before They Start
If you want the short list that saves the most pain, here it is.
- Insist on metal PV roof flashing that tucks under the upslope shingle course. Sealant alone is not enough.
- Use roof penetration sealants that are UV stable and rated for movement. Silicone, MS polymer, or butyl based products are your friends.
- Check your attic after soaking rains for stains, damp insulation, and musty odors. Those are your early alerts.
- Schedule annual roof and array inspections. Photograph each mount row and conduit entry. Track changes year over year.
- Call pros for leak testing and interior drying if you see or smell trouble. Mold can start in 24 to 72 hours.
FAQs About PV Roof Leaks
You have questions. We have straight answers, without the sugar coating.
Do Solar Panels Cause Roof Leaks?
No. Holes cause roof leaks. Panels sitting on clamps that do not penetrate metal roofing are not a problem. Panels on asphalt roofs require penetrations, which only leak when flashing or sealants are wrong, missing, or damaged by movement and sun.
Can I Just Recaulk The Mounts?
You can smear caulk on anything. That does not make it right. If flashing is wrong or the mount is loose, more caulk is a band aid that will crack again. The correct fix is proper flashing placement, the right sealant under the base, and tightening to structure.
How Fast Can Mold Grow From A Small Leak?
Under the right conditions, 24 to 72 hours. That is why we want to dry wet materials quickly and verify moisture levels before anyone paints, patches, or closes up a ceiling.
Will My Solar Warranty Cover Roof Leaks?
Sometimes. Many installers warrant workmanship on penetrations for a set period. If the leak is from storm damage or normal roof aging, that falls under insurance or roofing repair. Keep your install documentation and inspection records so you have leverage either way.
How Often Should I Inspect My Roof After Getting Solar?
Do a visual check after major storms and a formal inspection once a year. In hot sunny climates, consider semiannual checks because UV and heat punish sealants faster.
Need Help Right Now?
If you are staring at a ceiling stain under your array or you just caught musty air in the attic, do not wait. We can inspect, test for hidden moisture, dry the building, and coordinate with roofing or solar pros to stop the leak at the source. Start here: Water Damage Restoration and Mold Removal Services. If you need general info on our services, head to All Nation Restoration. Stop the leak, dry the inside, and keep your solar investment working without turning your attic into a swamp.