If your crawl space smells like a gym bag and your hardwood floors are suddenly doing yoga, you don’t have a ghost problem. You’ve got moisture. In humid climates, that crawl space is basically a mold incubator unless you control the humidity, stop bulk water, and treat the area like part of your home’s envelope. The golden rule is simple: keep relative humidity between 30 to 50 percent, because once you soar above 60 percent, mold throws a party. The fight everyone loves to pick is encapsulation vs venting, but the real answer starts with the causes, not the cure. Let’s get your crawlspace humidity control done right, with fewer regrets and zero unintended science experiments.
Why Crawl Spaces Get Wet
Crawl spaces can take on moisture from just about every direction. Groundwater vapor pushes up from bare soil. Poor grading funnels rain toward the foundation. Leaky downspouts dump water where it can seep under the house. Summer air sneaks in through vents and condenses on cool ductwork and framing. Plumbing pinholes quietly feed the ecosystem under your feet. Even if you never see standing water, persistent vapor loads can keep the relative humidity high enough to support mold and wood decay fungi. In humid zones like Texas and the Southeast, the outdoor air is often wetter than the air in your house, so venting can make the crawl space wetter, not drier.
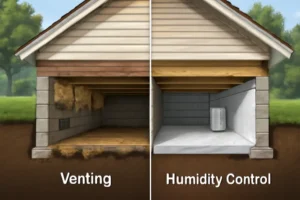
Venting: Quick Fix Or Moisture Magnet?
Traditional venting was meant to flush out moisture. On paper, it sounds decent. In practice, in humid climates, it often backfires. Warm, moist outdoor air enters, hits cooler framing and ductwork, the dew point wins, and you get condensation. That feeds mold on joists, rust on metal, and musty air that finds its way upstairs. Venting does have upsides: it costs less upfront, there are fewer components to maintain, and some jurisdictions still expect it for older construction. But if your average summer outdoor dew point is high, venting is a moisture magnet. If you rely on venting, you’re depending on the weather to save you, which is not a plan.
What Encapsulation Really Means
Encapsulation is not just rolling out a flimsy sheet of plastic and calling it a day. Done right, it turns the crawl space into a controlled space instead of a swamp. That means sealing the ground with a thick vapor barrier, wrapping and sealing up walls and piers, air-sealing penetrations, shutting the vents, and managing humidity with a properly sized dehumidifier. If bulk water is an issue, you add drains and a sump to move water out instead of trapping it. The crawl walls get insulated to make the space part of your home’s thermal envelope, not some cold void that sweats every time summer hits. Encapsulation changes the physics in your favor, but it only works when all the pieces play nicely together.
Encapsulation vs Venting: What Wins?
In humid zones, encapsulation wins the moisture control fight most of the time. Sealed crawl spaces consistently run lower relative humidity, fewer mold issues, and deliver better comfort upstairs. The difference shows up in wood moisture content and even energy bills. By insulating crawl walls rather than floors, you reduce duct losses, stop cold floors, and remove that musty airflow that robs your HVAC of efficiency. Venting can still be workable in drier climates or in homes with superb drainage and no mechanical systems in the crawl, but the minute your outdoor dew points live in the sticky range, venting is usually a losing bet.
| Criteria | Vented Crawl Space | Encapsulated Crawl Space |
|---|---|---|
| Humidity Control | Weather dependent, often poor in humid zones | Stable with vapor barrier + dehumidifier |
| Mold Risk | Higher in summer, frequent condensation | Lower when maintained under 60 percent RH |
| Energy Performance | Leaky ducts and cold floors waste energy | Better duct performance and comfort |
| Upfront Cost | Low to moderate | Moderate to high |
| Maintenance | Minimal, but problems go unnoticed | Dehumidifier service and routine checks |
| Best Fit | Dry climates with great drainage | Humid climates and mixed-humid zones |
Must-Do Prep Before Any Approach
If you skip the basics, you’ll lock in headaches. Start outside with grading that slopes soil away from the foundation by at least 6 inches over the first 10 feet. Extend downspouts well beyond drip lines. Repair gutters. If your crawl floods during storms, you need a perimeter drain or an interior French drain tied to a sump pump before you think about sealing anything. Inside, fix every plumbing leak. Insulate and air-seal ducts so you don’t create cold surfaces for summer sweat. The goal is to stop bulk water first, then control vapor, then manage air. Skipping steps here is how good money gets thrown after bad plastic.
Vapor Barriers That Actually Work
A vapor barrier is your crawl space’s raincoat, not a trash bag. Thin 6 mil poly is easily torn and riddled with holes. A real barrier is 12 to 20 mil, reinforced, and rated for ground contact. Seams should be overlapped 6 to 12 inches and taped with high quality vapor barrier tape, not duct tape. Run the liner up walls and piers, fasten mechanically with compatible fasteners and butyl or polyurethane sealant, and seal around penetrations. If you stop the liner at the floor, ground vapor will find the edges and laugh at you. In termite zones, keep a visible inspection gap along the top of the wall liner as required locally, typically a few inches below the sill. If your home has brick veneer, do not block weep holes. Every detail matters, because a 95 percent sealed liner is a 5 percent failure.
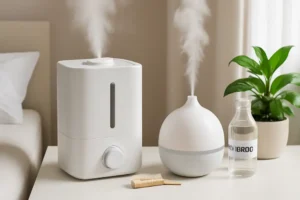
Dehumidifiers That Keep Up
The workhorse of crawlspace humidity control is a dehumidifier that can actually keep up. A pint-per-day rating on a big box sticker means little if the unit is not designed for low clearances, cooler crawl temps, or continuous duty. Choose a crawl-rated unit with a permanent drain or a reliable condensate pump and a washable filter. Size it to your square footage, leakage, and the typical summertime load. Set the controller between 45 and 55 percent RH, and give it some airflow so the dry air mixes throughout the space. Tie the drain into a proper discharge line, not into a trap that dries out and burps odors back into the crawl. If you encapsulate and skip the dehumidifier, you’ve set a table with no dinner.
Don’t Break Codes Or Common Sense
Encapsulation has a few traps that can turn smart projects into safety violations. If you have combustion appliances in the crawl space, they need proper combustion air and safe venting. Atmospherically vented water heaters and furnaces do not play nicely inside a sealed crawl. Consider upgrading to sealed combustion or relocating the appliance to a code-compliant mechanical room with dedicated outside air. Never starve a gas appliance of air and then wonder why the carbon monoxide alarm screams.
Termite rules are just as serious. Many areas require a clear inspection strip near the top of the foundation wall. That means the wall liner stops short, leaving a visible band so inspectors can see mud tubes. If foam insulation is used on crawl walls, check fire and ignition barrier requirements and termite inspection provisions. Electrical junction boxes need to stay accessible. Sump basins need tight lids and service access. If radon is a concern in your region, add a sub-membrane vent port during encapsulation so a mitigation fan can be added without surgery later. Good encapsulation is tidy, serviceable, and legal.
Insulation That Makes Sense
Insulating crawl space walls, not the underside of the floor, is usually the better play once you encapsulate. That turns the crawl into semi-conditioned space, reduces duct losses, and helps the dehumidifier. Rigid foam on walls should be rated for below-grade use, seams sealed, and protected as required. Rim joists need to be air-sealed and insulated carefully, since leaky rims are mold magnets. If you stick with a vented crawl in a dry climate, floor insulation needs to be snug, supported, and not smothering the underside of the subfloor. Wet fiberglass batts draped like hammocks are a sign that venting is not working.
Maintenance And Monitoring
Encapsulation is not a set-it-and-forget-it project. Put a hygrometer in the crawl with a remote display, or use a connected sensor, and check it seasonally. Replace or clean dehumidifier filters. Inspect the liner for damage and reseal seams if needed. Verify the sump pump runs and the check valve works. Look for new plumbing leaks after every cold snap. The quiet crawl is the healthy crawl, but you only earn that by visiting it once in a while with a flashlight and a plan.
When Venting Still Makes Sense
Venting is not universally wrong. In high desert climates or regions with consistently low outdoor dew points, a well-vented crawl with exceptional drainage can be stable. If there are no ducts or gas appliances down there, and your wood moisture content stays under control year round, venting can be adequate. Some homeowners use smart controls on powered vents to only move air when outdoor dew point is low enough to dry the crawl. That is a niche solution, not a humid-climate standard. If your doormat feels wet at breakfast in July, stick with encapsulation.
Crawlspace Mold: Remediation Basics
Mold on joists is a symptom. You still need to remove it. The process starts with isolation of the work area and air filtration. Materials with visible mold are cleaned using methods like HEPA vacuuming and controlled abrasion, followed by an antimicrobial on surfaces if appropriate. Don’t spray and pray over rot. If wood is decayed, it needs repair. Once cleaned, the only lasting fix is to bring the crawl into a humidity range where mold cannot rebound, which circles us back to crawlspace humidity control. Post-remediation verification should include a visual check and moisture readings. If you never address the moisture source, the mold will send you a thank-you card and come back.
Quick Cost And Value Reality
Encapsulation costs more upfront than opening a few vents, but it is not just a moisture play. You get better indoor air, fewer odors, better energy performance, and less wear on HVAC equipment. If insulation and ducts are in the crawl, the energy savings add up. The payback varies by house and climate, but the durability and health benefits show up quickly. If cost is the sticking point, phase it: fix drainage, then install a rugged ground liner, then seal walls and vents, then add the dehumidifier and wall insulation. Just do each step correctly so you aren’t redoing it later.
Practical Best Practices
Here is how we keep crawl projects from going sideways. Fix bulk water first outside and inside. Use a reinforced 16 to 20 mil liner, lap wide, tape and seal every seam, and run it up walls and piers with mechanical attachment. Seal vents and penetrations with foam and sealant, but maintain required termite inspection gaps. Insulate walls, not just floors, and air-seal rim joists carefully. Choose a crawl-rated dehumidifier with continuous drainage and set it to 45 to 55 percent RH. Provide safe combustion air or upgrade appliances if they live in the crawl. Keep weep holes open in brick veneer and keep electrical gear accessible. Then monitor. The homes that stay dry are the ones where someone cares enough to check.
FAQ
How do I know if my crawl space is too humid?
If a hygrometer shows more than 60 percent RH for more than a few days, it is too humid. Other clues: musty odors, cupping floors, sweating ducts, rusty fasteners, or visible mold on joists. Wood moisture content above roughly 16 percent is another warning sign.
Can I just add more vents to fix humidity?
In humid climates, more vents usually add more moisture. When outdoor dew point is high, venting brings in wet air that condenses on cool surfaces. You will not ventilate your way dry in muggy weather.
Do I need a dehumidifier if I encapsulate?
Yes, in most humid climates. The vapor barrier cuts ground moisture, but the crawl still needs active humidity control to stay under 60 percent RH through seasonal swings. Set it between 45 and 55 percent RH and service it like any appliance.
What thickness vapor barrier should I use?
Go with 12 to 20 mil, reinforced, and designed for ground contact. Thicker liners resist punctures during service, which protects your investment. Tape seams properly and seal edges to walls and piers.
Can I encapsulate if I have a gas water heater in the crawl?
Only if you provide proper combustion air and meet local code. Atmospherically vented appliances are risky in sealed spaces. Consider sealed combustion equipment or a code-compliant mechanical room with dedicated outside air. Install carbon monoxide alarms.
Do I still need to leave a gap for termite inspection?
In termite areas, yes. Local rules often require a visible band at the top of the foundation wall so inspectors can see mud tubes. Keep foam insulation and liners below the required gap.
Is radon a concern with encapsulation?
In some regions, yes. If radon is a concern in your area, add a vent port under the liner during encapsulation so a mitigation fan can be installed easily. Test before and after if local guidance recommends it.
Will encapsulation lower my energy bills?
Often, yes. Sealing and insulating the crawl can reduce duct losses and stabilize floor temperatures, which helps HVAC efficiency. Results vary by house and climate, but comfort improvements are almost immediate.
Ready For An Inspection?
If your crawl space smells swampy, your floors are cupping, or your allergies spike every time the AC kicks on, it is time to stop guessing. We inspect, measure, and build a crawlspace humidity control plan that actually matches your home. We will tell you if venting can work for your location or if encapsulation is the smarter long game, then install it without blocking combustion air or termite inspection gaps. You get dry wood, clean air, and a crawl space that stops picking fights with the rest of the house. Reach out and we will bring the flashlights, hygrometers, and the honest plan your crawl deserves.