You installed that shiny handheld sprayer to upgrade your bathroom game, not to slowly marinate your vanity, rot your subfloor, and stain the kitchen ceiling like a modern art piece. Here’s the part nobody likes to talk about: tiny, boring, slow leaks from bidet sprayers and add-on bidet seats are some of the sneakiest bathroom problems we find during water damage work. They barely drip. They run for months. And they love to hide in cabinets and wall cavities. If you want dry wood, zero mold, and a bathroom that doesn’t become a restoration project, stick with me. I’ll show you exactly where these leaks start, how to catch them fast, and the simple bidet sprayer maintenance moves that keep your subfloor alive.
The Silent Bidet Leak Problem
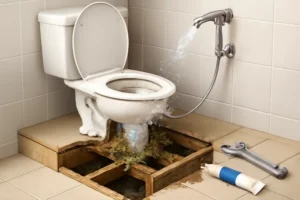
Most bathroom leaks make noise, spray, or produce a puddle that tattles. Bidet sprayers and add-on seats are the quiet kids. They leak at fittings, hoses, or internal valves just enough to keep surfaces damp, not wet. That slow dampness is perfect for swelling particle board cabinet bottoms, softening plywood subfloors, and waking up mold that absolutely loves dark, humid corners. If the bathroom’s upstairs, a slow leak can discolor the ceiling below and even delaminate drywall tape long before anyone suspects the bidet.
We’ve pulled apart plenty of vanities where the finish looks great on the outside, but the underside is a soggy cracker. The culprit almost always sits right at the toilet supply: the tee, the hose, or the shutoff habits. Leave light pressure on a weak seal long enough and it wins. It always wins.
Where Do Sprayers Leak?
Four places cause nearly all the drama. The good news: they’re easy to check and even easier to fix before damage spreads.
| Component | Common Leak Cause | Why It Matters |
|---|---|---|
| Supply Tee Connections | Loose threads, missing or warped washers or O-rings, cross-threading, wrong thread type | Drips roll to cabinet corners and into subfloor seams – slow, constant moisture equals rot and mold |
| Flexible Hose | Hose fatigue from high pressure, tight bends, abrasion against cabinet edges, weak crimps | Small leaks wick into drywall and floor layers instead of pooling where you see them |
| Sprayer Head or Bidet Seat | Internal valve not closing from mineral buildup, cracked caps, worn cartridges | Constant drips keep the area damp and feed hidden growth under and behind the toilet zone |
| Shutoff Valve Habits | Leaving tee lever open, worn stops, aging valves under constant pressure | Continuous pressure makes every weak seal weep – long duration equals structural risk |
Spot The Clues Early
Slow leaks leave a trail. It’s just faint. Train yourself to notice these tells and you’ll catch problems before your cabinet turns to oatmeal.
Start with your nose. Musty air inside the vanity or near the toilet base is a classic mold hint. Then check with your fingers – run them along the tee, the hose crimps, and the shutoff valve. If you feel slime, residue, or dusty mineral crust, you’ve got history of moisture. Touch the cabinet floor. If it feels cooler than room temp or a little spongy, water is creeping below.
Look for coffee-colored stains at cabinet seams, swollen edges on particle board bottoms, or darkened plywood around the toilet flange zone. If your bathroom is over a room with a ceiling, scan below for faint yellow arcs or soft paint bubbles. That’s evaporated minerals from repeated wetting, not a one-time splash.
One more simple trick we use on inspections: put a square of dry toilet paper under the tee and hose joints. Come back in a few hours. If it’s puckered or wrinkled, you’ve got a tiny, steady leak that needs attention.
Why The Tee And Hoses Fail
Sprayers work off your toilet’s cold supply. That means you add a tee or T-valve under the tank, then run a hose to the sprayer or seat. Easy install, but easy to mess up. Threads get cross-started. Flat washers get cocked. Rubber O-rings arrive out of place. Or someone uses thread tape where a flat washer should do the sealing and the connection never compresses right. Then there’s pressure. Municipal spikes and well systems can routinely hit the 80-plus psi zone. That level of pressure turns weak hoses into time bombs and accelerates failure at crimps and seals.
Routing matters too. If the hose hugs a sharp cabinet edge or makes a tight U turn behind the bowl, you create a permanent kink point that flexes every time the sprayer is used. Micro cracks form, then a pinhole leak starts. It’s tiny at first, then it becomes a slow mister that feeds the cabinet’s back corner for months.
Bidet Sprayer Maintenance That Works
You don’t need a toolbox the size of a pickup bed to keep your setup dry. You just need a routine. Here’s the formula we recommend for simple bidet sprayer maintenance and practical subfloor rot prevention.
First, control the pressure. When you’re not actively using the sprayer or seat, turn off the lever at the T-valve or the dedicated shutoff. That one habit drops stress on seals dramatically. If you live where pressure spikes are common, have a plumber set a home pressure regulator so static pressure lands near 50 to 60 psi. Your hoses will thank you.
Next, check the connection stack once a month. Hand dry the tee body, all three connector points, and the hose crimps. If anything feels damp after a flush cycle or five minutes of sitting, loosen the connection, confirm the washer or O-ring is present and not cupped, then reassemble. Make sure the threads start true by turning counterclockwise until you feel the threads click, then go clockwise to tighten. Use thread tape only on tapered metal threads that require it. If your seal relies on a flat washer, tape is not the hero here – alignment and compression are.
Hose routing should be smooth and lazy – no tight bends, no rubbing against raw wood or drawer runners. If you need to, add a small plastic edge guard where the hose passes a cabinet hole so it doesn’t saw itself apart. If the hose jacket shows any bulge, braid fray, or persistent dampness at the ferrules, replace it. Hoses are cheap. Cabinets are not.
Clean mineral buildup before it causes drips. If the sprayer head weeps even when the valve is off, soak the nozzle and internal parts per the manufacturer’s instructions with a safe descaling cleaner. Scale prevents valves from closing fully, which means a permanent after-drip. If that doesn’t solve it, replace the cartridge or the head. For bidet seats, follow the service guide for cleaning the intake screen and internal valve areas.
What Slow Leaks Do To Floors
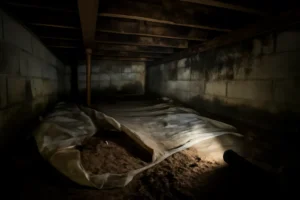
Wood doesn’t need to be soaked to fail. It just needs to sit at an elevated moisture content for long enough. We see swollen particle board bottoms first – they puff at the edges and crumble under finger pressure. Plywood subfloors darken along seams and can start to delaminate. Once moisture lingers in that range, mold colonizes the underside of the vanity floor and the subfloor framing. You get that faint mushroomy smell, then the bathroom develops chronic humidity because the wet materials keep evaporating.
If your bathroom sits above a living area, gravity takes the water into the ceiling cavity. You might notice a halo stain that grows slowly. Pull that drywall and you’ll often find fungal growth feeding off paper facings and dust. At that point, you’re not dealing with a cleaning job. You’re dealing with a controlled demolition, targeted drying, and rebuild. Catching the leak in month one instead of month twelve is the difference between a Saturday fix and a multi-trade project.
How To Check Without Guessing
Your eyes and nose are step one. Your hands and a dry tissue are step two. Step three, if you’re unsure, is a basic moisture meter. Pinless meters give a quick read on relative moisture in wood cabinet bottoms and subfloor areas. Pin meters give more precise numbers by inserting two small probes into the wood. If you’re reading elevated moisture on the vanity bottom or near the toilet flange, that’s your signal to open things up or call a pro.
Thermal imaging cameras add another layer. They don’t see water, but they see temperature differences. Evaporating moisture cools surfaces slightly, so you’ll spot a cooler patch under the toilet or along the cabinet floor that hints at a persistent leak. The combo of a meter and a thermal scan is how we confirm hidden water without ripping out half your bathroom on a hunch.
What Should You Do If You Find Moisture?
Start simple. Turn off the sprayer’s T-valve so the line is not constantly pressurized. Dry everything you can reach with towels. Remove the vanity kick plate if it pops off easily and dry behind it too. Set a small fan to move air through the cabinet for 24 to 48 hours. If the cabinet bottom is particle board and it already feels soft or swollen, plan on replacement – that material does not bounce back.
While that air is moving, fix the source. Reset washers and O-rings, replace the hose if there’s any question, and descale or replace the sprayer head if it drips. With the repairs done, keep the area open and ventilated. Recheck with a moisture meter after a day. If readings are still high or if there is visible mold growth on bare wood, stop playing whack-a-mole and bring in a restoration team that can open the right cavities, remove contaminated materials safely, and dry the structure thoroughly. Leaving trapped moisture in the subfloor is how you guarantee future odor, cupped flooring, and nails that loosen over time.
Maintenance And Rot Prevention
Here’s a simple routine that keeps bathrooms dry. It is quick, cheap, and it works every day of the year.
Turn the sprayer supply off at the T-valve after every use. This one habit is half the battle. It reduces constant stress on seals and hoses so they do not weep 24-7. Do a monthly glance inside the vanity and behind the toilet. You are looking for dampness, mineral crust, or wood darkening. Straighten any hose kinks and make sure nothing is rubbing where it should not. Replace washers, O-rings, and hoses annually or at the first sign of trouble. Clean mineral scale from nozzles and internal valves one or two times a year so they shut fully. And whenever you smell musty air or feel soft wood, use a moisture meter or call for an inspection before it blossoms into a teardown.
Two Quick Case Studies
Case 1 – The Cabinet Sponge: A homeowner installed a sprayer on a weekend and missed the flat washer in the tee stack. The connection looked dry during install, but under static pressure it seeped a drop every few minutes. For six months, that drop hit the back corner of the vanity, wicked along the particle board, and turned the entire base into a sponge. They noticed when a hair dryer cord stuck to the cabinet bottom. We opened the kick plate to find swelling and visible mold along the underside. The fix was easy on the plumbing – new washer, correct tightening – but the vanity bottom had to go. Total cost would have been a fraction if caught in month one with a simple tissue test.
Case 2 – The Upstairs Surprise: A second-floor add-on bidet seat had a gorgeous install, but the hose grazed a sharp cabinet hole. The homeowner left the T-valve on at all times. After a year, the hose developed a slow mist at the crimp. No puddles showed inside the vanity because the mist dampened the wall cavity and floor seam behind it. The first clue was a faint yellow crescent on the kitchen ceiling. We tracked it with thermal imaging, cut a small test opening, and found the subfloor seam darkened and the drywall paper supporting mild growth. The repair involved replacing a hose, sanding and sealing studs, targeted drying, and patching the ceiling. A simple edge guard and shutoff habit would have prevented it entirely.
Are You Using The Right Parts?
Not all hoses and tees are created equal. If you buy a kit, confirm the thread types match your shutoff and tank supply. Some connections seal with flat washers, others with tapered threads. Mixing them gets you a connection that only seals under luck, not pressure. Choose stainless braided hoses rated for household use, not the cheapest vinyl tube. If your water is hard, inspect any plastic parts more often because scale builds faster and can stress internal caps and cartridges. When in doubt, bring in a plumber for a quick fit check – that one visit costs less than one square foot of cabinet replacement.
Why Your Shutoff Habits Matter
Leaving a sprayer or seat under full pressure 24-7 is like leaving a garden hose pressurized on a hot day. Hoses fatigue, seals take a set, and weak points show up at the worst time. Get in the habit of closing the T-valve lever after use. It takes two seconds and prevents hours of cleanup. If the main stop valve at the wall is older and the handle feels loose or crusty, replace it. A fresh stop closes reliably when you need it and reduces the risk of a surprise spray while you are tightening a fitting.
Small Tools That Make You Smart
These are the low-tech helpers we keep recommending because they turn guessing into knowing. Keep a flashlight in the vanity so checks actually happen. A roll of paper towels or a stack of tissues is your cheapest leak detector. A pinless moisture meter lets you check cabinet bottoms and trim without holes. A small plastic edge trim or grommet saves hoses from cabinet cuts. And a decent descaler keeps nozzles from weeping all year. None of these cost much. All of them beat ripping out a wet subfloor.
What About Bidet Seats?
Add-on bidet seats are fantastic until a mineral crust keeps the internal intake valve from closing all the way. If you notice a faint refill sound or a small drip line at the seat’s rear connection, it is time for a cleaning session. Remove the seat per the manual, clear the intake screen, and descale any inlets and nozzles safely. If leaking continues, the internal cartridge may be worn. Replace it or the seat body before it turns into a long-term seep that saturates the cabinet wall. And just like with handheld sprayers, keep the supply off when not in use. Seats are full of tiny valves that prefer rest more than pressure.
How To Keep Cabinets Dry While You Test
Whenever you reassemble a tee or swap a hose, put a shallow tray or a plastic lid under the connections for a day. It catches stray drips without soaking the cabinet. Leave the vanity doors open so air moves. Run your hand around the fittings after each flush cycle. If you find a damp ring, you are not tight enough or you are missing the correct washer. Do not force metal on metal if the threads are fighting you – pull it apart, clean the threads, and start straight. Cross-threading is how small repairs become new leaks.
FAQ: Quick Answers For Dry Floors
Should I turn my bidet sprayer off after every use?
Yes. Closing the T-valve after each use drops the pressure on seals and hoses. It is the easiest long-term subfloor rot prevention habit you can build.
How often should I replace the hose?
Plan on annual inspection and replacement at the first sign of bulge, fray, or persistent dampness at the crimps. If your home runs higher pressure, replace more often.
Why does my sprayer drip even when it is off?
Scale can keep the internal valve from closing. Descale the nozzle and internals. If that fails, replace the cartridge or sprayer head.
Can I use thread tape on everything?
No. If the joint seals with a flat washer or O-ring, tape is usually not needed. Tape helps on tapered threaded joints that are designed to seal via thread interference.
How do I know if my subfloor is wet?
Soft flooring at the toilet base, musty odor, or stains on the ceiling below are clues. A moisture meter confirms it. If readings are high, call a restoration pro before the damage creeps wider.
When Should You Call Us?
If the cabinet bottom is soft, if you see dark streaks on the subfloor, if your ceiling downstairs looks like a watercolor, or if the smell sticks even after you dry the visible area, you are past the paper towel stage. Our team uses moisture meters and thermal imaging to find the actual wet zones, removes only what is necessary, dries the structure correctly, and handles any mold remediation needed. We do this every day, and we have seen every version of the sneaky bidet leak.
If you are catching this early, a quick inspection can save you from replacing cabinets, flooring, and ceilings. If it is already advanced, we will stabilize the area, protect the rest of your home, and get the bathroom put back together the right way. Either way, do not wait for the sprayer to confess. Set a check routine, shut the pressure off when you are not using it, and let us know if anything feels even slightly off. Dry cabinets and happy subfloors beat a surprise renovation every time.